Taste of Tech Topics

Acroquest Technology株式会社のエンジニアが書く技術ブログ

SpringBoot/Quarkus/Micronautの性能を検証してみた ~その1 起動編~

こんにちは。@phonypianistです。
本投稿はアクロクエスアドベントカレンダー 12月21日 の記事です。

最近、Quarkusアプリを本番適用しました。
QuarkusはJavaアプリを作るための軽量なフレームワークで起動が速いって聞くけど、実際どれくらい速いんだろう?と気になったので、Spring Bootや、類似OSSのMicronautと比べてみました。

背景

JavaフレームワークといえばSpringBootが主流ですが、起動が遅かったり、必要なメモリが多かったりしています。 これは、アプリ起動時にリフレクションを用いてDI(Dependency Injection)を行っているのが要因の1つです。

マイクロサービス、コンテナネイティブなアプリケーションは、負荷の状況に応じて、シームレスにスケールアウトできる必要があります。 アプリケーションの起動速度が遅かったり、メモリ消費量が多かったりすると、負荷に対してシステムの性能が追随できません。

この問題を解決し高速化するために、QuarkusやMicronautといった新しいフレームワークが登場しています。

ja.quarkus.io

micronaut.io

QuarkusもMicronautも、コンパイル時にDIの解決を行うことで、起動速度や処理速度の向上、およびメモリ使用量の削減ができます。

簡単に、SpringBoot、Quarkus、Micronautの特徴を以下にまとめます。

フレームワーク 特徴
SpringBoot
Quarkus
Micronaut
  • メモリ使用量が少なく、起動時間が短くなるようにしたJavaフレームワーク
  • SpringBootと一部互換性を持っており、SpringBootから移行しやすいように作られている

QuarkusやMicronautでは、GraalVMを使用してネイティブアプリも作ることができます。 これにより、アプリの起動時間を飛躍的に短縮し、メモリも節約することができます。
※Spring Bootもネイティブアプリが作れるようになりましたが、いくつか課題があるため今回は対象外としています。

今回は、アプリの起動における性能について、SpringBoot、Quarkus、Micronautでどれくらい異なるのか、調べてみました。 QuarkusとMicronautは、ネイティブアプリも計測してみました。

前提

環境構成

AWS Fargateを用いて、以下のアプリを起動します(それぞれ1コンテナずつ、計5コンテナを起動)。

  1. SpringBoot (Java)
  2. Quarkus (Java)
  3. Quarkus (Native)
  4. Micronaut (Java)
  5. Micronaut (Native)

性能比較構成

アプリの1コンテナあたりのリソースは、1vCPU、2GBメモリを割り当てました。

検証に使用するアプリ

データベースのテーブルにあらかじめ入っているレコードを取得・返却するアプリです。 REST APIを提供し、クライアントからそのAPIが呼び出されると、JPAを用いてデータベースからレコードを取得し、クライアントに返却します。 SpringBoot、Quarkus、Micronautそれぞれ同じ処理内容にしてあります。

使用するミドルウェア・ライブラリのバージョンは以下の通りです。

  • Java:17
  • SpringBoot:3.0.0
  • Quarkus:2.13.1.Final
  • Micronaut:3.7.1

それぞれのソースコードは以下の通りです。

SpringBoot

UserController.java

@RestController
@RequestMapping("user")
public class UserController {

    private final UserService userService;

    public UserController(UserService userService) {
        this.userService = userService;
    }

    @GetMapping
    Iterable<User> getAllUsers() {
        return userService.getAllUsers();
    }

    @GetMapping("/{userId}")
    User getUser(@PathVariable("userId") String userId) {
        return userService.getUser(userId);
    }

}

UserService.java

@Component
public class UserService {

    private final UserRepository userRepository;

    public UserService(UserRepository userRepository) {
        this.userRepository = userRepository;
    }

    public Iterable<User> getAllUsers() {
        return userRepository.findAll();
    }

    public User getUser(String userId) {
        return userRepository.findById(userId).orElseThrow(() -> new RuntimeException(userId));
    }

}

UserRepository.java

@Repository
public interface UserRepository extends CrudRepository<User, String> {

}

Quarkus

UserResource.java

@Path("/user")
@Produces("application/json")
public class UserResource {

    @Inject
    UserService userService;

    @GET
    public List<User> getAllUsers() {
        return userService.getAllUsers();
    }

    @GET
    @Path("/{userId}")
    public User getUser(@PathParam("userId") String userId) {
        return userService.getUser(userId);
    }

}

UserService.java

@ApplicationScoped
public class UserService {

    @Inject
    UserRepository userRepository;

    public List<User> getAllUsers() {
        return userRepository.findAllUsers();
    }

    public User getUser(String userId) {
        return userRepository.findByUserId(userId);
    }

}

UserReposirory.java

@ApplicationScoped
public class UserRepository implements PanacheRepository<User> {

    public List<User> findAllUsers() {
        return findAll().list();
    }

    public User findByUserId(String userId) {
        return find("user_id", userId).firstResult();
    }

}

Micronaut

UserController.java

@Controller("/user")
public class UserController {

    private final UserService userService;

    public UserController(UserService userService) {
        this.userService = userService;
    }

    @Get
    Iterable<User> getUsers() {
        return userService.getUsers();
    }

    @Get("/{userId}")
    User getUser(@PathVariable("userId") String userId) {
        return userService.getUser(userId);
    }

}

UserService.java

@Singleton
public class UserService {

    private final UserRepository userRepository;

    public UserService(UserRepository userRepository) {
        this.userRepository = userRepository;
    }

    public Iterable<User> getUsers() {
        return userRepository.findAll();
    }

    public User getUser(String userId) {
        return userRepository.findById(userId).orElseThrow(() -> new RuntimeException(userId));
    }

}

UserRepository.java

@Repository
public interface UserRepository extends CrudRepository<User, String> {

}

計測内容

5つのアプリを起動して、それぞれの起動速度(起動にかかった時間)と、メモリ使用量を計測します。

起動にかかった時間は、CloudWatchログに出力される、アプリ(各フレームワーク)の起動時間を確認します。 メモリ使用量は、CloudWatchメトリクスの値を確認します。

1つのアプリに対して5回起動し、最大と最小を除く3回分の、起動にかかった時間とメモリ使用量の平均値を計算しました。

計測結果

起動完了までの時間は、以下のようになりました。

フレームワーク別起動完了までの時間

起動完了までの時間は、やはりQuarkusもMicronautも、ネイティブアプリが爆速です。
Javaアプリの中では、Quarkusが他のフレームワークと比べると速くなっています。

続いて、起動直後のメモリ使用量です。

起動直後のメモリ使用量

メモリ使用量も、やはりネイティブアプリがJavaアプリの半分の量の消費で抑えられています。特にQuarkusのネイティブアプリはたった12MBの消費で抑えられています。
Javaアプリでは、SpringBootよりQuarkusやMicronautの方が、少し消費量が低くなっています。

まとめ

やはり、ネイティブアプリは起動時間もメモリ使用量もパフォーマンスが良いですね。 Javaアプリの中では、Quarkusが他のフレームワークよりもパフォーマンスが良いようです。
※アプリの構成や環境によって、変わることがあります。

今回は、起動時のパフォーマンスについて検証しました。
次回は、リクエスト処理性能について検証したいと思います。

それでは。

Acroquest Technologyでは、キャリア採用を行っています。
  • ディープラーニング等を使った自然言語/画像/音声/動画解析の研究開発
  • Elasticsearch等を使ったデータ収集/分析/可視化
  • マイクロサービス、DevOps、最新のOSSを利用する開発プロジェクト
  • 書籍・雑誌等の執筆や、社内外での技術の発信・共有によるエンジニアとしての成長
  少しでも上記に興味を持たれた方は、是非以下のページをご覧ください。 www.wantedly.com

Spring Modulith でモジュラモノリスなアプリの構造を検証してみた

アクロクエスアドベントカレンダー 12月9日 の記事です。

普段は Java, Python でバックエンドの開発をしている大塚優斗です😃

最近は Spring フレームワークのメジャーアップデートなどで盛り上がっていますね!

10月にこんな記事を見かけて、Spring Modulith がとても気になっていたので、手元で試したことを書いていきます✍️

Spring Modulith とは

Spring Modulith はモジュラモノリスな Spring Boot アプリケーションの開発をサポートするプロジェクトです。

元々は Moduliths というプロジェクトでしたが、現在はプロジェクト名が Spring Modulith に変更され、Spring Boot 3 をベースラインとした実験的なプロジェクトとなっています。

spring.io

モジュラモノリスは、モノリスのように単一でデプロイ可能な形を保ちつつ、マイクロサービスのようにモジュール性を持ったアーキテクチャです。
モジュラモノリスの説明は、日本語でとてもわかりやすい記事が書かれているので、そちらを参照してください。

モジュラモノリスに移行する理由 ─ マイクロサービスの自律性とモノリスの一貫性を両立させるアソビューの取り組み - エンジニアHub|Webエンジニアのキャリアを考える!

モジュラモノリスでは、自己完結したビジネスドメインに合わせた疎結合なモジュールを作ることが重要と言われています。
そうすることによって、モジュールごとに独立して開発することが容易になり、あるビジネスドメインで仕様の変更が起きたとしても、影響範囲を対応するモジュールに留めることができるなどのメリットがあるためです。

しかし、単一のリポジトリで開発するため、やろうと思えば各モジュールを密結合にすることができてしまいます。
例えば、Java では子パッケージのクラスを参照するには、子パッケージのクラスに public 修飾子をつける必要がありますが、これによって他モジュールのクラスからアクセスできるようになってしまいます。 さらに、コンパイラはこれらの意図しない参照に対して、警告してくれません。

Spring Modulith では、各モジュールを疎結合に保つためにモジュールの境界ルールを定め、それをテストとして扱うことで、開発者が良くモジュール化されたコードを実装することをサポートしてくれます。

Spring Modulith でできること

公式ドキュメントによると、主に下記のようなことができるようです。

  1. モジュール構造の検証
  2. モジュールに閉じた結合テスト
  3. イベントによるモジュール同士の連携
  4. モジュールのドキュメント化
  5. モジュール同士の連携のモニタリング

この記事では、5番目以外の項目を試していきたいと思います。

この記事内で扱うサンプルコードでは、Maven 3, Java 17, Spring Boot 3.0.0 を使用しています。

0. Spring Modulith でのパッケージの扱いについて

各機能を見ていく前に Spring Modulith におけるパッケージの扱いについて、説明しておきます。

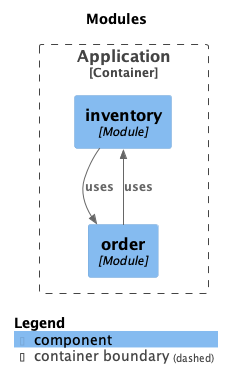
Spring Modulith では、メインアプリケーションクラスが存在するパッケージ直下のサブパッケージをアプリケーションモジュールと呼び、あるドメインに対応するモジュールとして扱います。
そして、アプリケーションモジュール直下の public なクラスは、そのモジュールの公開インターフェースとして扱われます。
また、アプリケーションモジュール配下のサブパッケージは、他のモジュールからアクセスされない内部的なものとして扱われます。

後述しますが、Spring Modulith ではモジュール構造にいくつかのルールが決められており、モジュール構造の検証テストを実行した際に、決まっているルールに違反した場合、テストが失敗します。

この記事内のサンプルコードでは、公式ドキュメントと同様に Order モジュールと Inventory モジュールを扱います。
ファイル構成は以下の通りです。

src/main/java/com/example
└── samplemodulith
    ├── SampleModulithApplication.java
    ├── inventory  # アプリケーションモジュール①
    │   ├── InventoryService.java  # アプリケーションモジュール直下のファイルは公開インターフェースとして扱われる
    │   └── internal  # 他モジュールからはアクセスされないカプセル化されたパッケージ
    │       └── InternalInventoryComponent.java
    └── order  # アプリケーションモジュール②
        ├── Order.java
        ├── OrderCompleted.java
        └── OrderService.java
src/test/java/com/example
└── samplemodulith
    ├── DocumentationTests.java
    ├── ModularityTests.java
    ├── SampleModulithApplicationTests.java
    ├── inventory
    │   └── InventoryIntegrationTests.java
    └── order
        └── OrderIntegrationTests.java
pom.xml

サンプルコードのパッケージ構造

1. モジュール構造の検証

Spring Modulith によるアプリケーションモジュールの検証では以下の3つのことができ、それぞれどういった場合にテストが失敗するかというルールがあります。

  1. 循環参照の検知
    • アプリケーションモジュール間で循環参照している場合にテストが失敗する
  2. 別モジュールへのアクセス違反の検知
    • あるアプリケーションモジュールが別のアプリケーションモジュールの内部パッケージを参照した場合にテストが失敗する
  3. 依存するアプリケーションモジュールの明示
    • 明示的にモジュールの依存関係を定義したときに他のアプリケーションモジュールへの依存があった場合にテストが失敗する

3 はオプション的な立ち位置なので、基本的な 1 と 2 をそれぞれ試していきます。

循環参照の検知

モジュール間に循環参照があった場合にテストで検知できることを試していきます。

サンプルコードでは、循環参照を作るためにコンストラクタで OrderService クラスと InventoryService クラスが相互依存するように定義しています。

package com.example.samplemodulith.order;

import com.example.samplemodulith.inventory.InventoryService;
import org.springframework.stereotype.Service;

@Service
public class OrderService {

    private final InventoryService inventoryService;

    public OrderService(InventoryService inventoryService) {
        this.inventoryService = inventoryService;
    }
}
package com.example.samplemodulith.inventory;

import com.example.samplemodulith.order.OrderService;
import org.springframework.stereotype.Service;

@Service
public class InventoryService {

    private final OrderService orderService;

    public InventoryService(OrderService orderService) {
        this.orderService = orderService;
    }
}

モジュール間で循環参照がある

モジュール構造の検証は ApplicationModules インスタンスverify メソッドで行えます。

package com.example.samplemodulith;

import org.junit.jupiter.api.Test;
import org.springframework.modulith.model.ApplicationModules;

public class ModularityTests {

    @Test
    void verifyModularity() {
        var modules = ApplicationModules.of(SampleModulithApplication.class);
        modules.forEach(System.out::println);
        modules.verify();
    }
}

テストを実行すると、以下のようにモジュール同士が循環参照していることをわかりやすく表示してくれました。

org.springframework.modulith.model.Violations: - Cycle detected: Slice inventory -> 
                Slice order -> 
                Slice inventory
  1. Dependencies of Slice inventory
    - Constructor <com.example.samplemodulith.inventory.InventoryService.<init>(com.example.samplemodulith.order.OrderService, com.example.samplemodulith.inventory.internal.InternalInventoryComponent)> has parameter of type <com.example.samplemodulith.order.OrderService> in (InventoryService.java:0)
    - Field <com.example.samplemodulith.inventory.InventoryService.orderService> has type <com.example.samplemodulith.order.OrderService> in (InventoryService.java:0)
  2. Dependencies of Slice order
    - Constructor <com.example.samplemodulith.order.OrderService.<init>(com.example.samplemodulith.inventory.InventoryService, org.springframework.context.ApplicationEventPublisher)> has parameter of type <com.example.samplemodulith.inventory.InventoryService> in (OrderService.java:0)
    - Field <com.example.samplemodulith.order.OrderService.inventoryService> has type <com.example.samplemodulith.inventory.InventoryService> in (OrderService.java:0)

別モジュールへのアクセス違反の検知

次は、あるモジュールが他モジュールの内部パッケージにアクセスしている場合に、テストで検知されることを確認してみます。

Order モジュールが Inventory モジュールの内部パッケージにあるクラスに依存するコードを用意します。

package com.example.samplemodulith.order;

import com.example.samplemodulith.inventory.internal.InternalInventoryComponent;
import org.springframework.stereotype.Service;

@Service
public class OrderService {

    private final InternalInventoryComponent internalInventoryComponent;

    public OrderService(InternalInventoryComponent internalInventoryComponent) {
        this.internalInventoryComponent = internalInventoryComponent;
    }

OrderモジュールのクラスがInventoryモジュールの内部パッケージにアクセスしている

先ほどと同じテストを実行すると、以下のようにエラーになりました。

org.springframework.modulith.model.Violations: - Module 'order' depends on non-exposed type com.example.samplemodulith.inventory.internal.InternalInventoryComponent within module 'inventory'!
OrderService declares constructor OrderService(InternalInventoryComponent, ApplicationEventPublisher) in (OrderService.java:0)
- Module 'order' depends on non-exposed type com.example.samplemodulith.inventory.internal.InternalInventoryComponent within module 'inventory'!
Field <com.example.samplemodulith.order.OrderService.internalInventoryComponent> has type <com.example.samplemodulith.inventory.internal.InternalInventoryComponent> in (OrderService.java:0)
- Module 'order' depends on non-exposed type com.example.samplemodulith.inventory.internal.InternalInventoryComponent within module 'inventory'!
Constructor <com.example.samplemodulith.order.OrderService.<init>(com.example.samplemodulith.inventory.internal.InternalInventoryComponent, org.springframework.context.ApplicationEventPublisher)> has parameter of type <com.example.samplemodulith.inventory.internal.InternalInventoryComponent> in (OrderService.java:0)

内部パッケージの中には、同一モジュールの公開インタフェースからの参照があるために public になるクラスもありますが、これらのクラスが別モジュールからアクセスされた場合に、テストで検知できるのはとても助かりますね。

2. モジュールに閉じた結合テスト

この章では、以下の2点を確認していきます。

  1. 単一のアプリケーションモジュールで結合テストができること
  2. Bootstrap モードによって、結合テスト時に他モジュールの Bean 生成ができること

単一のアプリケーションモジュールで結合テストができること

Spring Modulith では、ある単一のモジュールの結合テストを独立して実行できます。
これにより不要な Bean 生成をせずに済みます。

Spring Modulith では、 Spring Boot ではお馴染みの @SpringBootTest アノテーションの代わりに、@ApplicationModuleTest アノテーションを用いて、テストを実行します。

package com.example.samplemodulith.inventory;

import org.junit.jupiter.api.Test;
import org.springframework.beans.factory.annotation.Autowired;
import org.springframework.modulith.test.ApplicationModuleTest;

@ApplicationModuleTest
public class InventoryIntegrationTests {

    @Autowired
    private InventoryService inventoryService;

    @Test
    void test() {
    }
}

テスト実行後、以下のようなログが出力されます。 STANDALONE モードで起動され、他モジュールの依存性がないことがわかりますね。
他モジュールへの依存があった場合は、テストが失敗します。

Bootstrapping @ModuleTest for inventory in mode STANDALONE (class com.example.samplemodulith.SampleModulithApplication)========================================================================================================================
## inventory ##
> Logical name: inventory
> Base package: com.example.samplemodulith.inventory
> Direct module dependencies: none
> Spring beans:
  + ….InventoryService
  + ….internal.InternalInventoryComponent

Bootstrap モードによって、結合テスト時に他モジュールの Bean 生成ができること

次に、あるモジュールが他のモジュールの Bean に依存するパターンを見ていきます。

OrderモジュールがInventoryモジュールに依存している

この場合、2つのモジュール内で定義されている Bean を生成する必要がありますが、Spring Modulith には直接依存しているモジュールの Bean も同時に Bootstrap する DIRECT_DEPENDENCIES モードがあります。

@ApplicationModuleTest(mode = ApplicationModuleTest.BootstrapMode.DIRECT_DEPENDENCIES)
class OrderIntegrationTests {

    @Autowired
    private InventoryService inventoryService;

    @Test
    void test() {
    }
}

実行後のログは以下のようになります。

Order モジュールが Inventory モジュールに依存しており、Order モジュールの結合テストでは InventoryService クラスが注入されていることを確認できます。

Bootstrapping @ModuleTest for order in mode DIRECT_DEPENDENCIES (class com.example.samplemodulith.SampleModulithApplication)=============================================================================================================================
## order ##
> Logical name: order
> Base package: com.example.samplemodulith.order
> Direct module dependencies: inventory
> Spring beans:
  + ….OrderService
=============================================================================================================================
Included dependencies:
=============================================================================================================================
## inventory ##
> Logical name: inventory
> Base package: com.example.samplemodulith.inventory
> Direct module dependencies: none
> Spring beans:
  + ….InventoryService
  + ….internal.InternalInventoryComponent
=============================================================================================================================

ただし、依存先のモジュールが利用できない場合でもテストができるように、依存先モジュールの Bean をモックする方がベターです。

従来通り Spring Boot の @MockBean アノテーションを使用します。

@ApplicationModuleTest
class OrderIntegrationTests {

    @MockBean
    private InventoryService inventoryService;

    @Test
    void test() {
    }
}
Bootstrapping @ModuleTest for order in mode STANDALONE (class com.example.samplemodulith.SampleModulithApplication)====================================================================================================================
## order ##
> Logical name: order
> Base package: com.example.samplemodulith.order
> Direct module dependencies: inventory
> Spring beans:
  + ….OrderService

Order モジュールだけでテストが実行できていることが確認できました。

3. イベントによるモジュール同士の連携

よりモジュール同士を疎結合にするために、Spring Modulith ではモジュール間のやりとりに Spring Application Events を使うことを推奨しています。

モジュール間のやり取りにイベントを用いることで、呼び出し元が呼び出し先について知る必要がなくなり、テスト時も呼び出し先の Spring Bean に依存/モックする必要がなくなります。

Kafka などのメッセージングシステムを使用することに似ていますが、Spring Application Events は Spring Framework が提供しているため、追加の依存関係/インフラは必要ありません。

OrderService の実装は以下のようになります。InventoryService に依存しない形になりました。

package com.example.samplemodulith.order;

import org.springframework.context.ApplicationEventPublisher;
import org.springframework.stereotype.Service;

@Service
public class OrderService {

    private final ApplicationEventPublisher events;

    public OrderService(ApplicationEventPublisher events) {
        this.events = events;
    }

    public void complete() {
        events.publishEvent(new OrderCompleted());
    }
}
package com.example.samplemodulith.order;

public class OrderCompleted {
}

InventoryServiceはOrderCompletedイベントをlistenする

テストでは、@ApplicationModuleTest アノテーションによって、テストメソッドに PublishEvents インスタンスを注入することができます。

ログからも他のモジュールに依存しない形でテストできていることがわかります。

import org.springframework.modulith.test.PublishedEvents;

import static org.assertj.core.api.Assertions.assertThat;

@ApplicationModuleTest
class OrderIntegrationTests {

    @Autowired
    private OrderService orderService;

    @Test
    void complete_success(PublishedEvents events) {
        orderService.complete();

        assertThat(events.ofType(OrderCompleted.class)).hasSize(1);
    }
}
Bootstrapping @ModuleTest for order in mode STANDALONE (class com.example.samplemodulith.SampleModulithApplication)====================================================================================================================
## order ##
> Logical name: order
> Base package: com.example.samplemodulith.order
> Direct module dependencies: none
> Spring beans:
  + ….OrderService

4. モジュールのドキュメント化

SpringModulith では、モジュール間の関係を表すモジュールコンポーネント図と、モジュールキャンバスと呼ばれるモジュールの概要表を生成できます。

ドキュメントの生成には、ApplicationModules を使用し、以下のテストコードでモジュールコンポーネント図とモジュールキャンバスを作成しています。

package com.example.samplemodulith;

import org.junit.jupiter.api.Test;
import org.springframework.modulith.docs.Documenter;
import org.springframework.modulith.model.ApplicationModules;

public class DocumentationTests {

    ApplicationModules modules = ApplicationModules.of(SampleModulithApplication.class);

    @Test
    void writeDocumentationSnippets() {
        new Documenter(modules)
                .writeModulesAsPlantUml()
                .writeIndividualModulesAsPlantUml()
                .writeModuleCanvases();
    }
}

テスト実行後、target ディレクトリ配下に以下のような形で生成されたドキュメントが置かれます。

target/spring-modulith-docs
├── components.uml
├── module-beanreference.adoc
├── module-beanreference.uml
├── module-catalog.adoc
├── module-catalog.uml
├── module-inventory.adoc
├── module-inventory.uml
├── module-order.adoc
├── module-order.uml
├── module-typereference.adoc
└── module-typereference.uml

モジュールコンポーネント

コンポーネント図のスタイルには C4 か UML を選択できます。
図中でモジュール間の依存関係を表している矢印は以下の3つに分かれます。

  1. depends on
    • 他モジュールの型を参照している
  2. uses
    • 他モジュールのSpring Beanを参照している
  3. listen to
    • 他モジュールのイベントを待ち受けている

モジュールコンポーネント図の例。説明のためにtypereferenceモジュールとbeanreferenceモジュールを追加しています

モジュールキャンバス

Spring Modulith では、モジュールの概要を表形式でまとめたものをモジュールキャンバスと呼んでいます。
モジュールキャンバスは、以下のセクションに分かれており、Asciidoc ファイルで生成されます。

  1. アプリケーションモジュールのベースパッケージ名
  2. モジュールで公開されている Spring Beans
  3. jMolecules によって集約として扱われている集約ルート
  4. モジュールによって publish されるイベント
  5. モジュールによって listen されるイベント
  6. モジュールで公開されている Spring Boot Configuration properties

試しに Inventory モジュールのモジュールキャンバスを見てみると以下のようになっていました。

Inventoryモジュールのキャンバス

より多くのセクションが含まれている表の例が、公式ドキュメントに書かれているので、そちらも参照してください。

まとめ

今回は、Spring Modulith の基本的な使い方を手を動かしながら試してみました。

モジュラモノリスでアプリを作る際に、モジュール構成のテストをすることで、モジュールを疎結合に保ちながら開発できるのは心強いと思いました。

ちなみに、Spring Modulith 開発者の Oliver Drotbohm さんによると、2023年の第二四半期に非実験版のプロジェクトに昇格させる予定のようなので楽しみですね!

また、この記事で紹介できていない機能もあるので、興味がある方はぜひご自身で調べてみてください。

参考

Acroquest Technologyでは、キャリア採用を行っています。
  • ディープラーニング等を使った自然言語/画像/音声/動画解析の研究開発
  • Elasticsearch等を使ったデータ収集/分析/可視化
  • マイクロサービス、DevOps、最新のOSSを利用する開発プロジェクト
  • 書籍・雑誌等の執筆や、社内外での技術の発信・共有によるエンジニアとしての成長
  少しでも上記に興味を持たれた方は、是非以下のページをご覧ください。 www.wantedly.com

LambdaのSnapStartをSpring Cloud Functionで検証してみた

3歳の息子がきらきら星を歌っていたので、きらきら星変奏曲モーツァルト)を弾いたら、「それは違う」と否定されてしまった@phonypianistです。

AWS re:Invent 2022でLambdaのSnapStartが発表されました。サーバーレス界隈に衝撃が走っていますw
ということで、本ブログのアドベントカレンダー12/8の記事として、SnapStartを紹介します。

Lambda SnapStartとは

LambdaのInitフェーズに時間がかかる問題、いわゆるコールドスタート問題を解決するための機能です。

aws.amazon.com

Lambdaのライフサイクルは大まかには、「初期化 (Init)」「起動 (Invoke)」「シャットダウン (Shutdown)」の3つのフェーズに分かれています。

https://docs.aws.amazon.com/lambda/latest/dg/lambda-runtime-environment.html#runtimes-lifecycle より引用

最初の呼び出し、もしくはしばらく時間が経過したりスケールアウトしたりする際に「初期化」が行われますが、この部分はプログラムを実行するための環境準備やライブラリ読み込みなど、通常重い処理が行われます。 とりわけ、JavaではJava VMの起動があり、PythonやNode.jsに比べると「初期化」フェーズに時間がかかります。

SnapStartでは、Lambdaが実行されたときの状態のスナップショットを取っておき、それを復元することで、「初期化」フェーズの高速化を行います。 これにより、JavaではJava VMの起動が省略され、圧倒的に速くLambdaを起動することができるようになります。

実際にどれくらい高速になるのか、起動に時間がかかるSpringアプリケーション(Spring Cloud Function)を使って試してみました。 また、スナップショットのサイズはLambdaのメモリサイズに依存すると思われるため、Lambdaのメモリサイズにも影響するか検証してみました。

検証の概要

Spring Cloud Functionで作ったエコー(送られてきた文字をそのまま返す)アプリケーションをLambda上で動かし、CloudShellからリクエストを送って性能を検証します。

SnapStart検証構成

コールドスタートを確実に発生させるために、アプリケーションではリクエストを受けたときに1秒スリープさせます。

準備

プロジェクトの生成

Spring Cloud Functionのコードを用意します。 Spring Initializrで依存関係に「Spring Cloud Function」を追加してプロジェクトを生成します。今回はMavenプロジェクトにしました。 注意点として、LambdaはJava 11しか対応していないため、最新のSpring Boot 3は選択できません。Spring Boot 2とJava 11を選択してください。

pom.xmlの修正

生成したプロジェクトにはAWS用のライブラリがないため、pom.xmlにspring-cloud-function-adapter-awsを追加します。

<dependency>
  <groupId>org.springframework.cloud</groupId>
  <artifactId>spring-cloud-function-adapter-aws</artifactId>
</dependency>

Spring Bootが生成するJARファイルはそのままではLambdaから呼び出せないため、maven-shade-pluginでJARファイルを生成するように設定します。

<build>
  <plugins>
    <plugin>
      <groupId>org.springframework.boot</groupId>
      <artifactId>spring-boot-maven-plugin</artifactId>
      <dependencies>
        <dependency>
          <groupId>org.springframework.boot.experimental</groupId>
          <artifactId>spring-boot-thin-layout</artifactId>
          <version>1.0.28.RELEASE</version>
        </dependency>
      </dependencies>
    </plugin>
    <plugin>
      <groupId>org.apache.maven.plugins</groupId>
      <artifactId>maven-shade-plugin</artifactId>
      <dependencies>
        <dependency>
          <groupId>org.springframework.boot</groupId>
          <artifactId>spring-boot-maven-plugin</artifactId>
          <version>3.0.0</version>
        </dependency>
      </dependencies>
      <configuration>
        <createDependencyReducedPom>false</createDependencyReducedPom>
        <shadedArtifactAttached>true</shadedArtifactAttached>
        <shadedClassifierName>aws</shadedClassifierName>
        <transformers>
          <transformer implementation="org.apache.maven.plugins.shade.resource.AppendingTransformer">
            <resource>META-INF/spring.handlers</resource>
          </transformer>
          <transformer implementation="org.springframework.boot.maven.PropertiesMergingResourceTransformer">
            <resource>META-INF/spring.factories</resource>
          </transformer>
          <transformer implementation="org.apache.maven.plugins.shade.resource.AppendingTransformer">
            <resource>META-INF/spring.schemas</resource>
          </transformer>
        </transformers>
      </configuration>
    </plugin>
  </plugins>
</build>

これにより、 mvn clean package を実行することで、Lambdaで設定可能な snapstartdemo-0.0.1-SNAPSHOT-aws.jar ファイルが生成できます。

Javaコードの実装

簡易的に実装します。 メインクラスに echo メソッドを実装し、1秒待つ処理を追加します。

@SpringBootApplication
public class SnapStartDemoApplication {

    public static void main(String[] args) {
        SpringApplication.run(LambdademoApplication.class, args);
    }

    @Bean
    public Function<Flux<String>, Flux<String>> echo() {
        return flux -> flux.doOnNext(this::sleep);
    }

    private void sleep(String text) {
        try {
            Thread.sleep(1000);
        } catch (InterruptedException e) {
            // Do nothing.
        }
    }

}

serverless.yml

今回はServerless Frameworkでデプロイします。 512MB/1024MB/2048MB/4096MBの4種類のメモリサイズ×SnapStartのON/OFFの組み合わせで計8個のLambda関数を作成します。 アプリケーションはすべて同じとします。

SnapStartを有効にするために、resources.extensionsでSnapStartのApplyOnに PublishedVersions を指定します。

また、SnapStartはLambdaのバージョン指定での実行が必要です。Serverless FrameworkのデフォルトではAPI Gatewayから呼ばれるLambdaのバージョンは $LATEST になり、SnapStartのオプションを有効にしていてもSnapStartが機能しません。そのため、serverless-plugin-canary-deploymentsプラグインを用いて、API GatewayからLambdaを呼び出す際にLambdaバージョンが指定されるようにします。

service: snapstartdemo

provider:
  name: aws
  stage: dev
  region: ap-northeast-1
  runtime: java11
  timeout: 15
  logRetentionInDays: 7
  iamRoleStatements:
    - Effect: Allow
      Action:
        - codedeploy:*
      Resource:
        - '*'

package:
  # mvn clean packageで生成される、AWS用のjarファイルを指定する
  artifact: target/snapstartdemo-0.0.1-SNAPSHOT-aws.jar

functions:

  # これ以降は、SnapStart有効/無効の順番に、メモリサイズが異なるLambda関数を定義する
  # SnapStart有効/無効の設定は、下のresourcesに定義する

  SpringCloudFunction512MBSnapStartEnabled:
    handler: org.springframework.cloud.function.adapter.aws.FunctionInvoker::handleRequest
    memorySize: 512
    events:
      - http:
          method: get
          path: /snapstart/512/enabled
    deploymentSettings:
      type: AllAtOnce
      alias: Live

  SpringCloudFunction512MBSnapStartDisabled:
    handler: org.springframework.cloud.function.adapter.aws.FunctionInvoker::handleRequest
    memorySize: 512
    events:
      - http:
          method: get
          path: /snapstart/512/disabled
    deploymentSettings:
      type: AllAtOnce
      alias: Live

  SpringCloudFunction1024MBSnapStartEnabled:
    handler: org.springframework.cloud.function.adapter.aws.FunctionInvoker::handleRequest
    memorySize: 1024
    events:
      - http:
          method: get
          path: /snapstart/1024/enabled
    deploymentSettings:
      type: AllAtOnce
      alias: Live

  SpringCloudFunction1024MBSnapStartDisabled:
    handler: org.springframework.cloud.function.adapter.aws.FunctionInvoker::handleRequest
    memorySize: 1024
    events:
      - http:
          method: get
          path: /snapstart/1024/disabled
    deploymentSettings:
      type: AllAtOnce
      alias: Live

  SpringCloudFunction2048MBSnapStartEnabled:
    handler: org.springframework.cloud.function.adapter.aws.FunctionInvoker::handleRequest
    memorySize: 2048
    events:
      - http:
          method: get
          path: /snapstart/2048/enabled
    deploymentSettings:
      type: AllAtOnce
      alias: Live

  SpringCloudFunction2048MBSnapStartDisabled:
    handler: org.springframework.cloud.function.adapter.aws.FunctionInvoker::handleRequest
    memorySize: 2048
    events:
      - http:
          method: get
          path: /snapstart/2048/disabled
    deploymentSettings:
      type: AllAtOnce
      alias: Live

  SpringCloudFunction4096MBSnapStartEnabled:
    handler: org.springframework.cloud.function.adapter.aws.FunctionInvoker::handleRequest
    memorySize: 4096
    events:
      - http:
          method: get
          path: /snapstart/4096/enabled
    deploymentSettings:
      type: AllAtOnce
      alias: Live

  SpringCloudFunction4096MBSnapStartDisabled:
    handler: org.springframework.cloud.function.adapter.aws.FunctionInvoker::handleRequest
    memorySize: 4096
    events:
      - http:
          method: get
          path: /snapstart/4096/disabled
    deploymentSettings:
      type: AllAtOnce
      alias: Live

resources:
  - extensions:
      # SnapStartを有効にする設定を行う(デフォルトは無効)
      SpringCloudFunction512MBSnapStartEnabledLambdaFunction:
        Properties:
          SnapStart:
            ApplyOn: PublishedVersions
      SpringCloudFunction1024MBSnapStartEnabledLambdaFunction:
        Properties:
          SnapStart:
            ApplyOn: PublishedVersions
      SpringCloudFunction2048MBSnapStartEnabledLambdaFunction:
        Properties:
          SnapStart:
            ApplyOn: PublishedVersions
      SpringCloudFunction4096MBSnapStartEnabledLambdaFunction:
        Properties:
          SnapStart:
            ApplyOn: PublishedVersions

plugins:
  # Lambdaのバージョンを設定するためのプラグインを指定する
  - serverless-plugin-canary-deployments

デプロイ

deployコマンドでデプロイします。

serverless deploy

検証方法

クラスメソッドさんの以下の記事でまとまっていますので、こちらを参考にさせていただきました。 CloudShellから、API Gatewayに対して ab コマンドで100並列でリクエストを送ります。

dev.classmethod.jp

検証結果

Lambdaに割り当てたメモリサイズ毎に、SnapStartの無効/有効時のコールドスタートにかかった時間は、以下のようになりました。

メモリサイズ毎のコールドスタートにかかった時間(最小/最大/平均)
 SnapStart無効SnapStart有効
メモリサイズ最小最大平均最小最大平均
512MB4278.455049.414737.08195.01416.18285.83
1024MB4534.515200.474764.89267.76398.31326.71
2048MB3721.234659.764161.39203.59813.66321.07
4196MB3084.843607.293222.51212.74768.53353.76
メモリサイズ毎のコールドスタートにかかった時間(パーセンタイル)
 SnapStart無効SnapStart有効
メモリサイズp50p90p99p50p90p99
512MB4717.684881.765049.41283.59359.71416.18
1024MB4745.574906.425200.47321.88373.49398.31
2048MB4132.394345.264659.76345.51406.48813.66
4196MB3213.913354.723607.29354.87424.72768.53

90パーセンタイル値をグラフにすると、以下のようになりました。

割り当てメモリ毎のコールドスタート時間

どのメモリサイズでも、SnapStart有効の場合はSnapStart無効の場合に比べて約10倍も時間が短縮しています。

なお、Lambdaのメモリサイズを大きくすればするほど、SnapStartなしでの起動時間は短くなっていますが、SnapStart有効の場合はわずかに長くなっています。これはおそらく、スナップショットのサイズがメモリサイズに依存して大きくなっているものと思われますが、気にするほどではなさそうです。

まとめ

SnapStartを有効にすることで、JavaのLambdaコールドスタートの時間を大幅に短縮することができました。 今後はLambda関数をJavaで実装する、という選択もありかと思います。

ただ、X-Rayが使用できない、512MBより大きなエフェメラルストレージが使用できない等の制限があるため、注意が必要。 加えて、LambdaではJava 11(Amazon Corretto 11)しか選択できないのが残念なところ。 早くJava 17に対応してもらえないかなー。

では。

Acroquest Technologyでは、キャリア採用を行っています。
  • ディープラーニング等を使った自然言語/画像/音声/動画解析の研究開発
  • Elasticsearch等を使ったデータ収集/分析/可視化
  • マイクロサービス、DevOps、最新のOSSクラウドサービスを利用する開発プロジェクト
  • 書籍・雑誌等の執筆や、社内外での技術の発信・共有によるエンジニアとしての成長
  少しでも上記に興味を持たれた方は、是非以下のページをご覧ください。 www.wantedly.com

Springfox+Swagger+Bootprintによる即席REST API仕様書作成 ~制約編~

こんにちは、阪本です。

以前、「Springfox+Swagger+Bootprintによる即席REST API仕様書作成」というエントリーを書きましたが、今回はパラメータの制約をドキュメントに反映する方法について確認してみます。
なお、今回はSpringfoxのバージョンを2.3.1にしています。

@ApiModelPropertyによる制約の指定

まずは、Swagger Annotationを使ってパラメータの制約や説明の追加を行ってみます。

前回使用したEmployeeクラスに、@ApiModelPropertyアノテーションを追加します。

package swagger.entity;

import java.util.Date;

import javax.validation.constraints.NotNull;
import javax.validation.constraints.Size;

import org.hibernate.validator.constraints.NotEmpty;
import org.hibernate.validator.constraints.Range;

import io.swagger.annotations.ApiModelProperty;

public class Employee {
    private Integer id;
    private String  name;
    private Date    birthday;

    @ApiModelProperty(value = "Employee ID.", allowableValues = "range[1, 100]")
    @Range(min = 1, max = 100)
    public Integer getId() {
        return this.id;
    }

    public void setId(Integer id) {
        this.id = id;
    }

    @ApiModelProperty(value = "Employee's name.", required = true, allowableValues = "range[0, 32]")
    @NotEmpty
    @Size(max = 32)
    public String getName() {
        return this.name;
    }

    public void setName(String name) {
        this.name = name;
    }

    @ApiModelProperty(value = "Employee's birthday with ISO 8601 format.", required = true)
    @NotNull
    public Date getBirthday() {
        return this.birthday;
    }

    public void setBirthday(Date birthday) {
        this.birthday = birthday;
    }
}

value属性にプロパティの説明、requiredに必須かどうか、allowableValuesに値の範囲を指定します。他にも、例を指定したりプロパティ名を変更したりもできますが、ここでは割愛します。

上のようにEmployeeクラスを記述してSpringBootアプリケーションを起動すると、次のようにSwagger UIに反映されます。

http://localhost:8080/swagger-ui.html
f:id:acro-engineer:20160113022055p:plain

画面右側のModel部分に情報が反映されていることがわかります。idプロパティのinteger部分にカーソルを合わせると、allowableValuesに指定した範囲も見えます。
ちなみに、日付フォーマット等の、必須・範囲以外の制約については、value属性に説明として記述する必要があります(専用の属性がありません)。

バリデーション用のアノテーションから制約条件を取得する

上で説明した方法では、JSR-303のアノテーション(@NotNullや@Size等)の情報を取ってきているのではなく、あくまで@ApiModelPropertyの値を取ってきてドキュメントを生成しているに過ぎません。
プログラムで動作するバリデーション用アノテーションとドキュメント用アノテーションを両方記述するのは、手間なのとズレが発生するのとで、避けたいところです。
ということで、バリデーション用のアノテーション(JSR-303等)から制約条件を取得できるように修正を加えます。

残念ながら、現時点(2016年1月)の最新バージョンであるSpringfox 2.3やSwagger 1.5では実現できないため、自前でコードを書く必要があります。
具体的には、ModelPropertyBuilderPluginインタフェースを実装したクラスを作成します。@Componentを付けて、SpringBootのComponentScan対象にしておきます。

package swagger;

import javax.validation.constraints.NotNull;
import javax.validation.constraints.Size;

import org.hibernate.validator.constraints.NotEmpty;
import org.hibernate.validator.constraints.Range;
import org.springframework.stereotype.Component;

import com.fasterxml.jackson.databind.introspect.AnnotatedMethod;
import com.fasterxml.jackson.databind.introspect.BeanPropertyDefinition;
import com.google.common.base.Optional;

import springfox.documentation.builders.ModelPropertyBuilder;
import springfox.documentation.service.AllowableRangeValues;
import springfox.documentation.spi.DocumentationType;
import springfox.documentation.spi.schema.ModelPropertyBuilderPlugin;
import springfox.documentation.spi.schema.contexts.ModelPropertyContext;

@Component
public class Jsr303ModelPropertyBuilderPlugin implements ModelPropertyBuilderPlugin {

    @Override
    public boolean supports(DocumentationType delimiter) {
        return true;
    }

    @Override
    public void apply(ModelPropertyContext context) {
        ModelPropertyBuilder builder = context.getBuilder();

        // プロパティのgetterを取得する
        Optional<BeanPropertyDefinition> beanPropDef = context.getBeanPropertyDefinition();
        BeanPropertyDefinition beanDef = beanPropDef.get();
        AnnotatedMethod method = beanDef.getGetter();
        if (method == null) {
            return;
        }

        // 必須・非必須を取得する
        NotNull notNull = method.getAnnotation(NotNull.class);
        NotEmpty notEmpty = method.getAnnotation(NotEmpty.class);
        if (notNull != null || notEmpty != null) {
            builder.required(true);
        }

        // 範囲制約を取得する
        Range range = method.getAnnotation(Range.class);
        if (range != null) {
            builder.allowableValues(new AllowableRangeValues(
                    Long.toString(range.min()), Long.toString(range.max())));
        }
        Size size = method.getAnnotation(Size.class);
        if (size != null) {
            builder.allowableValues(new AllowableRangeValues(
                    Long.toString(size.min()), Long.toString(size.max())));
        }
    }
}

Jsr303ModelPropertyBuilderPluginクラスのapplyメソッドで、各プロパティのgetterについているアノテーションを取得し、その内容に応じてModelPropertyBuilderに制約条件を設定しています。
#「Jsr303」というクラス名にしていますが、Hibernate Validatorのアノテーションも処理対象に加えています^^;

上記クラスを作成しておけば、次のように、Employeeクラスの@ApiModelPropertyから制約に関連する属性(requiredとallowableValues)を削除し、冗長な記述を排除できます。
(getterのみ抜粋して記載)

@ApiModelProperty(value = "Employee ID.")
@Range(min = 1, max = 100)
public Integer getId() {
    return this.id;
}

@ApiModelProperty(value = "Employee's name.")
@NotEmpty
@Size(max = 32)
public String getName() {
    return this.name;
}

@ApiModelProperty(value = "Employee's birthday with ISO 8601 format.")
@NotNull
public Date getBirthday() {
    return this.birthday;
}

これらを実施した上で再度SpringBootアプリケーションを起動すると、先ほどと同じSwagger UIページが生成されます。
必要に応じて対応アノテーションを増やす必要はありますが、冗長な記述は排除できました。

bootprint-swaggerで静的ドキュメント生成!

ということで、前回同様、bootprint-swaggerでHTMLのAPI仕様書を生成してみます。

f:id:acro-engineer:20160113024921p:plain

なかなか難しい表現が出てきました・・・(汗)
{ x ∈ Z | 1 ≤ x ≤ 100 } のZは、代数学で言うところの「整数の集合」を表しています。
あと、nameのところは (up to chars) と出力され、具体的な文字列長が出てきませんでした。
ちょっとイマイチ感がありますね。。

Bootprint側のカスタマイズは調べてみようと思います。

それでは。

Acroquest Technologyでは、キャリア採用を行っています。


  • 日頃勉強している成果を、AWSHadoop、Storm、NoSQL、SpringBoot、HTML5/CSS3/JavaScriptといった最新の技術を使ったプロジェクトで発揮したい。
  • 社会貢献性の高いプロジェクトに提案からリリースまで携わりたい。
  • 書籍・雑誌等の執筆や対外的な勉強会の開催を通した技術の発信や、社内勉強会での技術情報共有により、技術的に成長したい。
  • OSSの開発に携わりたい。

 
少しでも上記に興味を持たれた方は、是非以下のページをご覧ください。
 競合は海外・外資!国内に新規市場を生み出す新サービス開発者WANTED! - Acroquest Technology株式会社の求人 - Wantedly

Springfox+Swagger+Bootprintによる即席REST API仕様書作成

こんにちは。阪本です。

世の中、Swagger注目を浴びてきていますね。
開発のスピードアップが求められる中、「外部IF仕様書なんて書いてられねぇ!!」なんて言って実装をバリバリ進めてしまいそうですが(アカンアカン)、そうは言っても外部IF、他社との仕様調整も必要。

そんなときに有効な、実装しながら仕様書も作れるSpringfox+Swaggerに加え、ドキュメント生成ツールのBootprintを使って、簡易的な仕様書を作ってみました。

仕様書の動的生成

以下のようなシンプルなSpringBootアプリケーションから、REST APIを生成してみます。

@SpringBootApplication
public class SwaggerExampleMain {
    public static void main(String[] args) {
        SpringApplication.run(SwaggerExampleMain.class, args);
    }
}
@RestController
@RequestMapping("/employee")
public class EmployeeController {
	
    @RequestMapping(method = RequestMethod.GET)
    public List<Employee> list() {
        // Return employee list
        return new ArrayList<>();
    }

    @RequestMapping(method = RequestMethod.POST)
    public void create(@RequestBody Employee employee) {
        // Add employee
    }

    @RequestMapping(value = "/{id}", method = RequestMethod.PUT)
    public void update(@PathVariable Integer id,
            @RequestBody Employee employee) {
        // Update employee
    }

    @RequestMapping(value = "/{id}", method = RequestMethod.DELETE)
    public void delete(@PathVariable Integer id) {
        // Delete employee
    }
}

まずはpom.xml。Springfoxを追加します。

<springfox.version>2.2.2</springfox.version>

~~~

<dependency>
  <groupId>io.springfox</groupId>
  <artifactId>springfox-swagger2</artifactId>
  <version>${springfox.version}</version>
</dependency>
<dependency>
  <groupId>io.springfox</groupId>
  <artifactId>springfox-swagger-ui</artifactId>
  <version>${springfox.version}</version>
</dependency>

そして、Swaggerの設定を行うJavaConfigクラスを作成します。
@EnableSwagger2アノテーションを付けて、Docketでいろいろ指定するところがミソです。
今回は、「/error」以外のURIを持つREST APIのドキュメントを一覧化することにします。

import static springfox.documentation.builders.PathSelectors.regex;

import org.springframework.context.annotation.Bean;
import org.springframework.context.annotation.Configuration;

import springfox.documentation.builders.ApiInfoBuilder;
import springfox.documentation.builders.RequestHandlerSelectors;
import springfox.documentation.service.ApiInfo;
import springfox.documentation.spi.DocumentationType;
import springfox.documentation.spring.web.plugins.Docket;
import springfox.documentation.swagger.web.UiConfiguration;
import springfox.documentation.swagger2.annotations.EnableSwagger2;

@Configuration
@EnableSwagger2
public class SwaggerConfig {
    @Bean
    public Docket documentation() {
        return new Docket(DocumentationType.SWAGGER_2).select().apis(
                RequestHandlerSelectors.any()).paths(
                        regex("^/(?!error).*$")).build().pathMapping("/").apiInfo(metadata());
    }

    @Bean
    public UiConfiguration uiConfig() {
        return UiConfiguration.DEFAULT;
    }

    private ApiInfo metadata() {
        return new ApiInfoBuilder().title("Employee API").version("1.0").build();
    }
}

これらを書いて、Javaアプリを普通に起動するだけで、APIの一覧とパラメータが見えるようになります。
http://localhost:8080/swagger-ui.html

f:id:acro-engineer:20151202021445p:plain

さらに、この画面でAPIに対してリクエストを送信することもできます。
簡易的な動作確認をするにも便利ですね。

オフライン仕様書生成

上記はアプリを起動しないとAPIの情報が見られませんでしたが、顧客や他チームと共有できる環境がなく恵まれない場合もあります。
そんなときは、オフラインの仕様書を生成しましょう。

オフラインの仕様書はSpringfoxでもMarkdown形式で生成できますが、ここはあえてMarkdownドキュメントが見られない(ツールなんて入れてない)人のことも想定し、HTML形式で出してみます。

Swagger2Markupという選択肢もありましたが、何となく使うのが大変そうだったので、今回はbootprint-swaggerを使ってみます。


node.jsをインストールした環境で以下のコマンドを実行し、bootprint-swaggerをインストールします。

npm install -g bootprint
npm install -g bootprint-swagger

Springfoxの設定を行ったJavaアプリを立ち上げ、bootprint-swaggerを実行します。

bootprint swagger http://localhost:8080/v2/api-docs target

これにより、targetフォルダ配下にHTMLファイルが生成されます。

f:id:acro-engineer:20151202021450p:plain

なんとなく、それっぽいドキュメントができました^^;

おわりに

とりあえず、ソースコードからREST API仕様書を生成できましたが、パラメータの桁数やフォーマットなど、「仕様書」としてはまだまだ情報が不足しています。
次回は、そのあたりの詳細情報の出力について、確認してみたいと思います。

それではー。

Acroquest Technologyでは、キャリア採用を行っています。


  • 日頃勉強している成果を、AWSHadoop、Storm、NoSQL、SpringBoot、HTML5/CSS3/JavaScriptといった最新の技術を使ったプロジェクトで発揮したい。
  • 社会貢献性の高いプロジェクトに提案からリリースまで携わりたい。
  • 書籍・雑誌等の執筆や対外的な勉強会の開催を通した技術の発信や、社内勉強会での技術情報共有により、技術的に成長したい。
  • OSSの開発に携わりたい。

 
少しでも上記に興味を持たれた方は、是非以下のページをご覧ください。
 キャリア採用ページ

Spring BootによるWebアプリお手軽構築

こんにちは、阪本です。


Springのメジャーバージョンアップに伴い、Spring Bootも晴れて1.0となりました。
Spring Bootは、Spring周りの依存関係をシンプルに解決してくれるフレームワークですが、今流行りの(流行る予定の?)Dropwizardを意識した作りになっています。

どれだけシンプルにできるのか、見てみようと思います。

超シンプルなWebアプリの作成

では早速、Webアプリを作ってみましょう。
手始めに、サーバにアクセスすると固定文字列を返す(いわゆるHello World的な)アプリを作ってみます。


まず、下ごしらえとして、Mavenのpom.xmlを作成します。

<project xmlns="http://maven.apache.org/POM/4.0.0"
    xmlns:xsi="http://www.w3.org/2001/XMLSchema-instance"
    xsi:schemaLocation="http://maven.apache.org/POM/4.0.0 http://maven.apache.org/maven-v4_0_0.xsd">
  <modelVersion>4.0.0</modelVersion>
  <groupId>springboot</groupId>
  <artifactId>sample</artifactId>
  <packaging>jar</packaging>
  <version>1.0.0</version>
  <name>SpringBootSample</name>

  <parent>
    <groupId>org.springframework.boot</groupId>
    <artifactId>spring-boot-starter-parent</artifactId>
    <version>1.0.2.RELEASE</version>
  </parent>

  <dependencies>
    <dependency>
      <groupId>org.springframework.boot</groupId>
      <artifactId>spring-boot-starter-web</artifactId>
    </dependency>
  </dependencies>

  <build>
    <plugins>
      <plugin>
        <groupId>org.springframework.boot</groupId>
        <artifactId>spring-boot-maven-plugin</artifactId>
      </plugin>
    </plugins>
  </build>
</project>

なんと、dependencyは「spring-boot-starter-web」を指定するのみ!
ちなみに、packagingが「jar」になっていることに注意。

・・・そう、単体のアプリケーションで動作するんです。
(ちなみに、warファイルを作成することも可能。)


次は、コントローラを用意します。特に何の変哲もない、普通のコントローラですね。

package springboot.sample.controller;

import org.springframework.stereotype.Controller;
import org.springframework.web.bind.annotation.RequestMapping;
import org.springframework.web.bind.annotation.ResponseBody;

@Controller
public class SampleController {
    @RequestMapping("/home")
    @ResponseBody
    public String home() {
        return "Hello Spring Boot!!";
    }

}


最後に(もう最後!)メインクラスを用意します。

package springboot.sample;

import org.springframework.boot.SpringApplication;
import org.springframework.boot.autoconfigure.EnableAutoConfiguration;
import org.springframework.context.annotation.ComponentScan;

@ComponentScan
@EnableAutoConfiguration
public class Application {

    public static void main(String[] args) {
        SpringApplication.run(Application.class, args);
    }

}


あとは、maven packageして、jarを実行するだけ。

java -jar sample-1.0.0.jar 

jarの中に必要なライブラリが含まれているため、クラスパスの指定も不要!
このあたり、Dropwizardライクな感じですね。


コンソールにはこんな出力があり、約2秒で起動しました。
組み込みTomcatが起動しています。(ちなみにJettyにも変更可能です。)

  .   ____          _            __ _ _
 /\\ / ___'_ __ _ _(_)_ __  __ _ \ \ \ \
( ( )\___ | '_ | '_| | '_ \/ _` | \ \ \ \
 \\/  ___)| |_)| | | | | || (_| |  ) ) ) )
  '  |____| .__|_| |_|_| |_\__, | / / / /
 =========|_|==============|___/=/_/_/_/
 :: Spring Boot ::        (v1.0.2.RELEASE)

2014-06-01 10:55:28.993  INFO 7740 --- [           main] springboot.sample.Application            : Starting Application on ...
2014-06-01 10:55:29.026  INFO 7740 --- [           main] ationConfigEmbeddedWebApplicationContext : Refreshing org.springframework.boot.context.embedded.AnnotationConfigEmbeddedWebApplicationContext@16022d9d: startup date [Tue Apr 25 01:55:29 JST 2014]; root of context hierarchy
2014-06-01 10:55:29.824  INFO 7740 --- [           main] .t.TomcatEmbeddedServletContainerFactory : Server initialized with port: 8080
2014-06-01 10:55:30.016  INFO 7740 --- [           main] o.apache.catalina.core.StandardService   : Starting service Tomcat
2014-06-01 10:55:30.016  INFO 7740 --- [           main] org.apache.catalina.core.StandardEngine  : Starting Servlet Engine: Apache Tomcat/7.0.52
2014-06-01 10:55:30.109  INFO 7740 --- [ost-startStop-1] o.a.c.c.C.[Tomcat].[localhost].[/]       : Initializing Spring embedded WebApplicationContext
2014-06-01 10:55:30.110  INFO 7740 --- [ost-startStop-1] o.s.web.context.ContextLoader            : Root WebApplicationContext: initialization completed in 1087 ms
2014-06-01 10:55:30.490  INFO 7740 --- [ost-startStop-1] o.s.b.c.e.ServletRegistrationBean        : Mapping servlet: 'dispatcherServlet' to [/]
2014-06-01 10:55:30.492  INFO 7740 --- [ost-startStop-1] o.s.b.c.embedded.FilterRegistrationBean  : Mapping filter: 'hiddenHttpMethodFilter' to: [/*]
2014-06-01 10:55:30.760  INFO 7740 --- [           main] o.s.w.s.handler.SimpleUrlHandlerMapping  : Mapped URL path [/**/favicon.ico] onto handler of type [class org.springframework.web.servlet.resource.ResourceHttpRequestHandler]
2014-06-01 10:55:30.875  INFO 7740 --- [           main] s.w.s.m.m.a.RequestMappingHandlerMapping : Mapped "{[/],methods=[],params=[],headers=[],consumes=[],produces=[],custom=[]}" onto public java.lang.String springboot.sample.controller.SampleController.home()
2014-06-01 10:55:30.888  INFO 7740 --- [           main] o.s.w.s.handler.SimpleUrlHandlerMapping  : Mapped URL path [/webjars/**] onto handler of type [class org.springframework.web.servlet.resource.ResourceHttpRequestHandler]
2014-06-01 10:55:30.889  INFO 7740 --- [           main] o.s.w.s.handler.SimpleUrlHandlerMapping  : Mapped URL path [/**] onto handler of type [class org.springframework.web.servlet.resource.ResourceHttpRequestHandler]
2014-06-01 10:55:30.981  INFO 7740 --- [           main] o.s.j.e.a.AnnotationMBeanExporter        : Registering beans for JMX exposure on startup
2014-06-01 10:55:30.999  INFO 7740 --- [           main] s.b.c.e.t.TomcatEmbeddedServletContainer : Tomcat started on port(s): 8080/http
2014-06-01 10:55:31.001  INFO 7740 --- [           main] springboot.sample.Application            : Started Application in 2.326 seconds (JVM running for 2.7)

そして、http://localhost:8080/home にアクセスすると、こんな感じに、文字が表示されました。

f:id:acro-engineer:20140424005318p:plain

web.xmlいらず、applicationContext.xmlいらずでWebアプリが立ち上がるなんて、超シンプルですね!

Thymeleafを用いた画面作成

先ほどは、URLにアクセスすると単に文字列を返すだけのものでした。
今度は、Thymeleafを用いて画面を作成します。

まず、pom.xmlにThymeleafを追加します。

<dependency>
  <groupId>org.thymeleaf</groupId>
  <artifactId>thymeleaf-spring4</artifactId>
</dependency>

次に、ThymeleafのHTMLテンプレートファイルを作成します。
HTMLテンプレートファイルはsrc/main/resources/templatesディレクトリの下に配置します。

hello.html

<!DOCTYPE html>
<html xmlns:th="http://www.thymeleaf.org">
<body>
  <h1>
    Hello Spring <span style="color: red">Boot!!</span>
  </h1>
</body>
</html>

最後に、上で作ったhello.htmlを表示するよう、Controllerを書き換えます。

package springboot.sample.controller;

import org.springframework.stereotype.Controller;
import org.springframework.web.bind.annotation.RequestMapping;

@Controller
public class SampleController {
    @RequestMapping("/home")
    public String home() {
        return "hello";
    }

}

先ほどと同じく http://localhost:8080/home にアクセスすると、hello.htmlの内容が表示されました。

f:id:acro-engineer:20140424005711p:plain

監視&デバッグ

デバッグ時に、Springコンテキストに何が登録されているか、分かると便利ですよね?
Spring Bootでは、pom.xmlに以下を追加するだけで、Web画面にコンテキストの内容を表示できます。

<dependency>
  <groupId>org.springframework.boot</groupId>
  <artifactId>spring-boot-starter-actuator</artifactId>
</dependency>

起動した後、http://localhost:8080/beans にアクセスすると、以下のようなJSONデータが表示されます。

[
  {
    "beans": [
      {
        "bean": "application", 
        "dependencies": [], 
        "resource": "null", 
        "scope": "singleton", 
        "type": "springboot.sample.Application"
      }, 
      {
        "bean": "sampleController", 
・・・

実際には、改行されずに出力されるので、整形する必要はあります。

コンテキスト以外にも、以下のような様々な情報をWebから取得できるようになります。

  1. 環境変数http://localhost:8080/env
  2. Controllerのマッピング状態(http://localhost:8080/mapping
  3. HTTPリクエストトレース(http://localhost:8080/trace
  4. アクセスカウンタ/メトリクス(http://localhost:8080/metrics
  5. スレッドダンプ(http://localhost:8080/dump

ここもDropwizard的ですね。

WebアプリにSSH接続

なんと!起動したWebアプリにSSHで接続してコマンドを実行することができます!!

pom.xmlに以下を追加して、ビルド&起動。

<dependency>
  <groupId>org.springframework.boot</groupId>
  <artifactId>spring-boot-starter-remote-shell</artifactId>
</dependency>

起動途中に、コンソールに以下のような内容が出力されます。これ(以下では662dc881-c2e3-4ad6-802e-73a36e4fc7e3)がデフォルトのログインパスワード。
(デフォルトのログインパスワードは、起動の度に変わります。)

2014-06-01 11:21:34.180  INFO 4464 --- [           main] roperties$SimpleAuthenticationProperties : 

Using default password for shell access: 662dc881-c2e3-4ad6-802e-73a36e4fc7e3

デフォルトのユーザ名はuser、SSH接続ポートは2000のため、この設定で接続してみると・・・

f:id:acro-engineer:20140424005923p:plain

ログインできました!

デフォルトでは、metrics、beans、autoconfig、endpointコマンドが使用できます。
もちろん、JavaやGroovyで自作のコマンドを定義することもできます。

例えば、src/main/resources/commandsディレクトリに、以下の内容でhello.groovyファイルを作成しておけば、
helloコマンドが実行できるようになります。

package commands

import org.crsh.cli.Usage
import org.crsh.cli.Command

class hello {

    @Usage("Say Hello")
    @Command
    def main(InvocationContext context) {
        return "Hello"
    }

}

f:id:acro-engineer:20140424005934p:plain

Webアプリのコントロールを行えるようなコマンドを、簡単に提供できそうですね。
ちなみに、このSSHの機能はCRaSHを用いて実現されています。

おわりに

ここで紹介した内容は、設定ファイルはMavenのみで、Springの設定ファイルを何一つ作成していません。

  • Springのライブラリ依存や設定ファイルに悩まされず手軽にWebアプリを構築したい!
  • Webアプリの管理もRESTやCLIでできるようにしたい!
  • Dropwizardのような「ポータブルなWebアプリケーション」を作成したい!

という要望に、Spring Bootは応えてくれそうですね。

では。


Acroquest Technologyでは、キャリア採用を行っています。


  • 日頃勉強している成果を、Hadoop、Storm、NoSQL、HTML5/CSS3/JavaScriptといった最新の技術を使ったプロジェクトで発揮したい。
  • 社会貢献性の高いプロジェクトに提案からリリースまで携わりたい。
  • 書籍・雑誌等の執筆や対外的な勉強会の開催を通した技術の発信や、社内勉強会での技術情報共有により、技術的に成長したい。
  • OSSの開発に携わりたい。

 
少しでも上記に興味を持たれた方は、是非以下のページをご覧ください。
 キャリア採用ページ

Spring XMLでCamelを書いて、twitterとelasticsearchを連携(Apache Camel入門 その3 Spring XMLについて)

こんにちは、もっと多くのJava技術者がCamelで楽できるはずと信じているツカノ(@)です。

前回は、発達したJavaのエコシステムの恩恵にあずかり、実質数行のJavaコードで、twitterとelasticsearchを連携させることができました。
今回は、Spring XMLでCamelを記述することで、twitterとelasticsearchを連携させてみましょう。

f:id:acro-engineer:20131125064348p:plain

「Camelって何?」って人は、前回までの内容を確認しておきましょう。

CamelのDSLについて

これまで説明してきたCamelのサンプルは、Javaのコードでした。実はこれはCamelの一面でしかありません。Camelは様々なDSLで表現することができ、Java DSLはその中のひとつです。CamelのDSLページによると、今のところ、以下のようなDSLを使うことができます。

プロジェクトの特性などに合わせて好きなDSLを使えるのは、Camelの良いところです。今後、Clojureとか、JRubyのDSLが出てきたら面白いですね。
さて、Springを使っているプロジェクトは多いと思いますので、Spring XMLを使ってみましょう。今までJavaのコードで表現していたCamelをSpringのXMLで表現します。このDSLを使うと、Camelのoption設定等をハードコードせずにCamelを利用することができます。また、Springの資産(DI等)を利用することができます。今回の例では登場しませんが、Springのscopeを利用すれば、グローバルなオブジェクトを利用することも、スレッド単位で異なるオブジェクトを利用することもできます。

Spring XMLで実装してみましょう

mavenをインストールしてあれば、アプリケーション開発のひな型を生成できます。以下のコマンドを実行してください(groupId, artifactId, versionは作成するアプリケーションに合わせて読み換えてください)。

mvn archetype:generate -DgroupId=snuffkingit \
    -DartifactId=camel-example-spring \
    -Dversion=1.0.0-SNAPSHOT \
    -DarchetypeGroupId=org.apache.camel.archetypes \
    -DarchetypeArtifactId=camel-archetype-spring \
    -DarchetypeVersion=2.12.1

このシリーズの1回目で似たようなこと行いましたね。そこではarchetypeArtifactIdとして「camel-archetype-java」を指定していました。それを「camel-archetype-spring」に変更しただけです。

さて、mavenでひな型を生成ましたが、今回はJavaコードは生成されていません。代わりに生成される、以下の設定ファイルを変更します。

src/main/resources/META-INF/spring/camel-context.xml

前回作成したTwitterCrowler.javaをcamel-context.xmlに置き換えると以下の通りです。(twitter APIのconsumerKey, consumerSecret, accessToken, accessTokenSecretについてはマスクしています)

<?xml version="1.0" encoding="UTF-8"?>
<!-- Configures the Camel Context-->

<beans xmlns="http://www.springframework.org/schema/beans"
       xmlns:xsi="http://www.w3.org/2001/XMLSchema-instance"
       xmlns:camel="http://camel.apache.org/schema/spring"
       xsi:schemaLocation="
       http://www.springframework.org/schema/beans http://www.springframework.org/schema/beans/spring-beans.xsd
       http://camel.apache.org/schema/spring http://camel.apache.org/schema/spring/camel-spring.xsd">

  <camel:camelContext>
    <camel:route>
      <camel:from uri="twitter://search?type=direct&amp;keywords=camel&amp;consumerKey=xxx&amp;consumerSecret=xxx&amp;accessToken=xxx&amp;accessTokenSecret=xxx"/>
      <camel:marshal>
        <camel:json library="Jackson"/>
      </camel:marshal>
      <camel:to uri="elasticsearch://elasticsearch?operation=INDEX&amp;indexName=twitter&amp;indexType=tweet"/>
    </camel:route>
  </camel:camelContext>

</beans>

直観的にイメージは伝わると思いますが、詳細はSpring XMLのページを確認してください。また、前回のコンポーネント説明でcamel-twittercamel-elasticsearchの使い方ページを確認した際に気がつかれたかもしれませんが、Camelの公式サイトでは多くのページでJava DSLとSpring XMLの両方で解説してあります。

Spring XMLを使ったCamelの概要は以下の通りです。

  • camelContextタグに囲った中にCamelの処理を記述します。このタグの外側は通常のSpringのXMLとして使えます。
  • camelContextタグの中にrouteタグを書き、その中にrouteの構成を記述します。
  • fromやtoはタグ名に置き換えて、uriは属性として記述します。
  • 注意点としては、Javaでは文字列に「&」を使えますが、XMLの属性には「&」は使えません。「&」はエスケープが必要なため、「&」→「&amp;」に置き換えます。

また、JSONに変換する部分はCamelでのJSONを説明したページが参考になります。

前回同様、pom.xmlに以下のdependencyを入れることも必要です。

    <dependency>
      <groupId>org.apache.camel</groupId>
      <artifactId>camel-twitter</artifactId>
      <version>${camel-version}</version>
    </dependency>
    <dependency>
      <groupId>org.apache.camel</groupId>
      <artifactId>camel-elasticsearch</artifactId>
      <version>${camel-version}</version>
    </dependency>
    <dependency>
      <groupId>org.apache.camel</groupId>
      <artifactId>camel-jackson</artifactId>
      <version>${camel-version}</version>
    </dependency>

ちなみに、archetypeArtifactIdにcamel-archetype-springを指定してgenerateしているため、生成されたpom.xmlのdependencyにはcamel-springが予め記述されています。

Spring XMLを実行してみましょう

では、これを実行してみましょう。
手っ取り早く実行するには、mavenで実行して下さい。

mvn camel:run

Javaコマンドから実行するには、以下のように実行してください。(Camelから環境変数を参照している訳ではないため、${CLASSPATH}は直接記述しても問題ありません)

java -cp ${CLASSPATH} org.apache.camel.spring.Main

デフォルトでは「${CLASSPATH}/META-INF/spring/*.xml」というファイルを探し、それを設定ファイルとして利用します。具体的にファイルを指定する場合は、引数「-fa」で指定します。(Camelから環境変数を参照している訳ではないため、${CLASSPATH}、${CONTEXT_PATH}は直接記述しても問題ありません)

java -cp ${CLASSPATH} org.apache.camel.spring.Main -fa ${CONTEXT_PATH}/camel-context.xml

実行結果をkibanaで見てみると以下のようになりました。
f:id:acro-engineer:20131211081825j:plain

と言う訳で、Spring XMLを使って、twitterとelasticsearchを連携させることができました。

まとめ

3回にわたりApache Camelの入り口について説明してきましたが、その強力さの一端は伝わったでしょうか。
このようなことができる背景には以下のような要因があります。

  • Java製のOSSは非常に多いこと(今回の例ではtwitter、elasticsearchへのアクセス)
  • OSS同士をCamelで連携できること
  • Spring XMLを使えばハードコーディングせずCamelを使ったアプリケーションを書けること

Camelのコンポーネント一覧を見ると、twitterやelasticsearchだけでなく、多数のOSSに関するコンポーネントが提供されていることが分かります。また、対応しているOSSは日々増えています。「Camelを積極的に使い、使いづらければCamelのコンポーネントを修正してコミュニティにフィードバック」という流れができると、より使いやすさが増すのではないかと思います。

このシリーズで説明したCamelの機能は本当に触りの部分です。Camelでは多くの処理を実現できます。分岐させたり、データ変換したり、特定部分をマルススレッド化したり、、、気になった方は、是非、Camelを利用して今使っているOSSにアクセスしてみてください。
Camelを使って楽をしましょう!
 

Acroquest Technologyでは、キャリア採用を行っています。


  • 日頃勉強している成果を、Hadoop、Storm、NoSQL、HTML5/CSS3/JavaScriptといった最新の技術を使ったプロジェクトで発揮したい。
  • 社会貢献性の高いプロジェクトに提案からリリースまで携わりたい。
  • 書籍・雑誌等の執筆や対外的な勉強会の開催を通した技術の発信や、社内勉強会での技術情報共有により、技術的に成長したい。
  • OSSの開発に携わりたい。

 
少しでも上記に興味を持たれた方は、是非以下のページをご覧ください。
 キャリア採用ページ