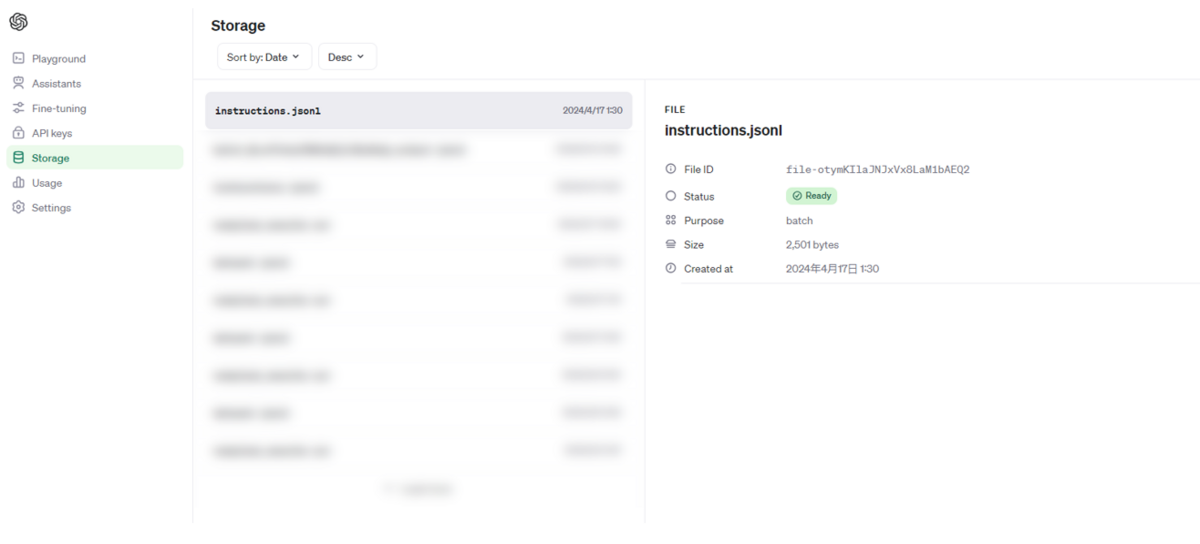
実行結果を確認する
Batchが完了すると以下のようにOpenAIのコンソールにBatch実行結果のファイルが追加されていることが分かります。
今回はGPT-4 Turboを使うとはいえ10行だけだったので、10分弱で処理が完了しました。
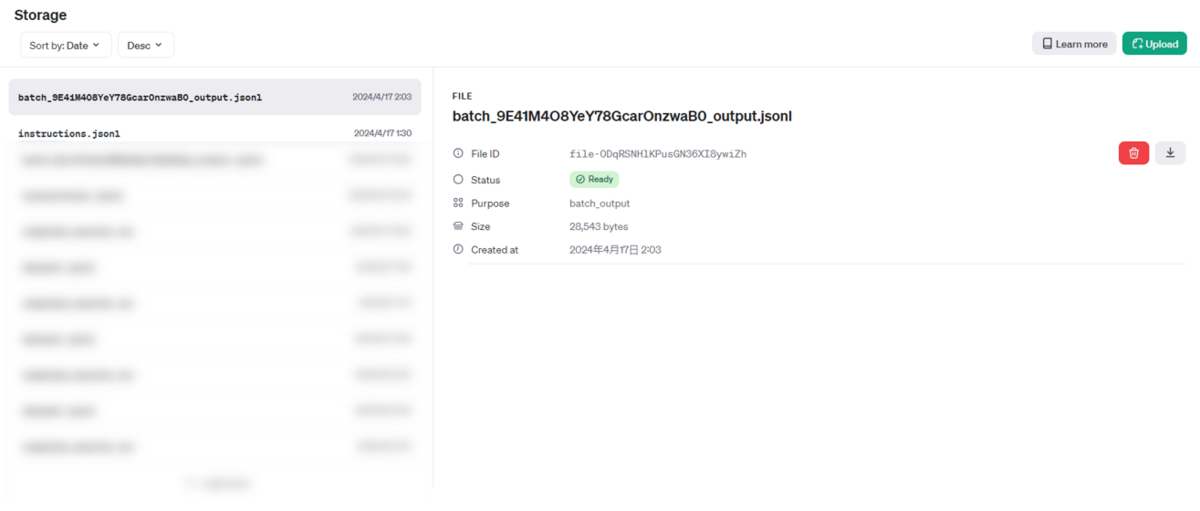
ダウンロードして中身を見ると以下のようにプロンプトを実行した結果の一覧を見ることができます。
ChatCompletionで得られるレスポンスは一通り記載されているので、usageなどの情報も見ることができます。
(長いので3行抜粋)
{"id": "batch_req_hZUECCsIMAT0NsrZ9taQC2S6", "custom_id": "request-7", "response": {"status_code": 200, "request_id": "req_735f5251489d353939dbda942ef6b37c", "body": {"id": "chatcmpl-9EgV0dWTMLrXNsPBSWA5Wj1xX2JRY", "object": "chat.completion", "created": 1713286986, "model": "gpt-4-turbo-2024-04-09", "choices": [{"index": 0, "message": {"role": "assistant", "content": "Getting started with machine learning (ML) can be an exciting journey into a field full of opportunities for innovation and impact across various industries like finance, healthcare, automotive, and more. Here\u2019s a structured way to begin learning about machine learning:\n\n### 1. Understand the Basics\nStart by gaining a foundational understanding of the concepts and terminology used in machine learning. Here are some key topics to cover:\n- **Basic Statistics & Mathematics:** Understand mean, median, mode, standard deviation, probability, and linear algebra.\n- **Types of Machine Learning:** Learn about supervised learning, unsupervised learning, reinforcement learning, and semi-supervised learning.\n- **Key Algorithms:** Get familiar with algorithms like linear regression, logistic regression, decision trees, SVM (Support Vector Machines), and neural networks.\n\n### 2. Online Courses\nThere are many online platforms offering free and paid courses that can provide structured learning and hands-on practice:\n- **Coursera:** Andrew Ng\u2019s Machine Learning course is highly recommended.\n- **edX:** Offers courses from MIT and Harvard.\n- **Udacity:** Known for its Nanodegree programs in Deep Learning and Machine Learning.\n- **Khan Academy:** Good for strengthening your math skills.\n\n### 3. Get Hands-On Experience\nAlongside theoretical learning, it\u2019s essential to practice:\n- **Kaggle:** Participate in competitions or explore datasets.\n- **GitHub:** Look at ML projects and try to replicate them. Start your own projects and share them.\n- **Python Libraries:** Get familiar with Scikit-learn, TensorFlow, PyTorch, and Pandas. Python is widely used in the machine learning community due to its simplicity and powerful libraries.\n\n### 4. Books\nSome good books to start with are:\n- **\u201cPattern Recognition and Machine Learning\u201d** by Christopher M. Bishop\n- **\u201cMachine Learning Yearning\u201d** by Andrew Ng (more strategy than technical details)\n- **\u201cHands-On Machine Learning with Scikit-Learn, Keras, and TensorFlow\u201d** by Aur\u00e9lien G\u00e9ron\n\n### 5. Work on Projects\nApplying what you\u2019ve learned to actual projects is crucial:\n- Begin with simple projects like predicting stock prices, or recognizing hand-written digits.\n- Move on to more complex problems as you grow comfortable.\n\n### 6. Follow Thought Leaders and Keep Updated\n- Follow key influencers on platforms like LinkedIn, Twitter, Medium.\n- Regularly read articles, research papers, and blogs to keep up with new trends and breakthroughs in ML technology.\n\n### 7. Engage with the Community\n- Participate in Meetups, Conferences, and Workshops.\n- Engage in forums like Stack Overflow, Reddit's r/MachineLearning, or Cross Validated on Stack Exchange.\n\n### 8. Understand Ethical Implications\nAs you delve deeper, understand the ethical considerations in deploying ML, including bias, fairness, and the environmental impact of training large models.\n\n### 9. Consider Specialization\nAs you advance, think about specializing in areas that are in high demand, such as deep learning, natural language processing, or computer vision, depending on what interests you the most.\n\nStarting with these steps will help you build a strong foundation and guide you through becoming proficient in machine learning. Always remember, consistent practice and continual learning are key components of success in this ever-evolving field."}, "logprobs": null, "finish_reason": "stop"}], "usage": {"prompt_tokens": 26, "completion_tokens": 685, "total_tokens": 711}, "system_fingerprint": "fp_76f018034d"}}, "error": null}
{"id": "batch_req_DiZi0B5pBGwoESHn2VgSjrSz", "custom_id": "request-8", "response": {"status_code": 200, "request_id": "req_c3651f89bbb024df85d35a8d2f0c27b7", "body": {"id": "chatcmpl-9EgV0COWoixZMe7OszEThJlqb6xQU", "object": "chat.completion", "created": 1713286986, "model": "gpt-4-turbo-2024-04-09", "choices": [{"index": 0, "message": {"role": "assistant", "content": "Sure! To run the OpenAI API in Python, you'll primarily rely on the `openai` library. Let\u2019s use an example where we send a prompt to the GPT model and receive a text completion. First, you need to install the OpenAI Python library if you haven't yet. You can install it using pip:\n\n```bash\npip install openai\n```\n\n### Example Code for Using OpenAI GPT\n\nHere's a simple example of how you can use the API to interact with the GPT model. In this code snippet, I assume you have your API key ready. For security reasons, you should not hard-code your API Key in your source code. Instead, use environment variables or other secure methods to store your API Key.\n\n```python\nimport openai\n\ndef get_gpt_response(prompt_text):\n    openai.api_key = 'your-api-key-here'\n\n    try:\n        response = openai.Completion.create(\n            engine=\"text-davinci-003\",  # You can use different models like \"davinci\", \"curie\", etc.\n            prompt=prompt_text,\n            max_tokens=150  # You can adjust this value based on your needs\n        )\n        return response.choices[0].text.strip()\n    except Exception as e:\n        print(f\"An error occurred: {e}\")\n        return None\n\n# Example usage\nprompt_text = \"Explain the benefits of AI in education.\"\nresponse_text = get_gpt_response(prompt_text)\nprint(response_text)\n```\n\n### Notes:\n1. **API Key Security**: Do not hard-code your API keys in your code. Instead, use environment variables. You can set this up in your local environment or whatever deployment environment you are using.\n\n2. **API Usage Limits**: Be aware of the usage limits and potential costs associated with API requests. Make sure to review OpenAI's usage policies and pricing.\n\n3. **Error Handling**: The code includes basic error handling which is crucial for dealing with network issues or API limits.\n\n4. **Model Selection**: OpenAI provides various models with different capabilities and cost structures. Choose the appropriate model based on your needs.\n\n5. **Response Processing**: The response from the API contains multiple components. We are mostly interested in the textual completion, which is accessed via `response.choices[0].text`.\n\n6. **Environment**: This code is to be run in a standard Python environment where you have the necessary permissions and network access to reach OpenAI's API servers.\n\nThis should help you get started with using OpenAI's API in your Python applications!"}, "logprobs": null, "finish_reason": "stop"}], "usage": {"prompt_tokens": 31, "completion_tokens": 526, "total_tokens": 557}, "system_fingerprint": "fp_76f018034d"}}, "error": null}
{"id": "batch_req_8nDALG7zrVMxiFk5o6nvrYbT", "custom_id": "request-5", "response": {"status_code": 200, "request_id": "req_0ef9ec2e8d633ebdf9f5000d9386136d", "body": {"id": "chatcmpl-9EgV0tJJ5JRL8SJxp7IvMlpfcPuYC", "object": "chat.completion", "created": 1713286986, "model": "gpt-4-turbo-2024-04-09", "choices": [{"index": 0, "message": {"role": "assistant", "content": "Microsoft Azure, commonly referred to simply as Azure, is a cloud computing service created by Microsoft for building, testing, deploying, and managing applications and services through Microsoft-managed data centers. It provides software as a service (SaaS), platform as a service (PaaS), and infrastructure as a service (IaaS) and supports many different programming languages, tools, and frameworks, including both Microsoft-specific and third-party software and systems.\n\n### Major Features of Azure:\n1. **Computing**: Azure provides virtual machines, containers, and batch processing, as well as remote application access.\n2. **Storage Solutions**: This includes Azure Blob storage, Queue Storage, File Storage, and Table Storage.\n3. **Networking**: This feature provides a variety of networking tools such as Virtual Networks, VPN Gateways, Application Gateways, and Content Delivery Networks.\n4. **Databases**: Azure offers managed SQL and NoSQL database services.\n5. **Mobile and Web Applications**: Azure facilitates the development, testing, and hosting of web and mobile applications.\n6. **AI and Machine Learning**: Tools and services designed to automate operations using AI and machine learning.\n7. **Internet of Things (IoT)**: Azure IoT Hub and other tools help collect, monitor, and analyze IoT data.\n8. **Developer Tools**: Provides support for DevOps, continuous integration, and testing environments.\n9. **Security**: Azure\u2019s security services protect workloads, applications, and data across cloud and hybrid environments.\n\n### Advantages of Azure:\n- **Scalability and Flexibility**: Azure can scale up or down based on demand, making it suitable for businesses of all sizes.\n- **Compliance and Security**: Azure has many compliance certifications and is built with security in mind, offering users peace of mind regarding their data.\n- **Hybrid Capabilities**: Azure provides a wide range of hybrid connections, including VPNs, caches, content delivery networks, and express routing connections to improve usability and performance.\n- **Integrated Environment**: Azure is deeply integrated with other Microsoft products, making it an ideal choice for organizations that rely on Microsoft tools and software.\n\n### Use Cases:\n- **Web Hosting**: Businesses can use Azure to host their websites and web applications.\n- **Data Storage and Backup**: It provides secure and scalable cloud storage solutions.\n- **Mobile App Development**: Azure supports backend services for mobile applications.\n- **Big Data and Analytics**: Offering powerful analytics services to handle large sets of data.\n- **Disaster Recovery**: With high availability and data recovery capabilities, Azure is an excellent option for disaster recovery.\n\nAzure continually evolves by expanding its services and capabilities to suit a broad spectrum of industries, including finance, health, government, manufacturing, and more, providing comprehensive cloud solutions for businesses globally."}, "logprobs": null, "finish_reason": "stop"}], "usage": {"prompt_tokens": 22, "completion_tokens": 556, "total_tokens": 578}, "system_fingerprint": "fp_76f018034d"}}, "error": null}
以上でBatch APIを使う一通りの流れは完了になります。
実行自体はファイルアップロードしてAPIを実行するだけなので簡単でしたね。
ただし、簡単な注意事項としてリリースされたばかりだからか、日本語を結果で出力するときには下記のようにUnicodeがそのまま出力されてしまいます。
{"id": "batch_req_LFEtMhsQqZa4GU5qpXLTVmES", "custom_id": "request-1", "response": {"status_code": 200, "request_id": "req_5cdf7d1538045d5946d0dcaa0edf4c79", "body": {"id": "chatcmpl-9EWZ0wTGl6VRZm0AHZrenKMi6gdiE", "object": "chat.completion", "created": 1713248794, "model": "gpt-3.5-turbo-0125", "choices": [{"index": 0, "message": {"role": "assistant", "content": "\u65b0\u6a2a\u6d5c\u306b\u306f\u591a\u304f\u306e\u304a\u3044\u3057\u3044\u30e9\u30fc\u30e1\u30f3\u5c4b\u304c\u3042\u308a\u307e\u3059\u304c\u3001\u305d\u306e\u4e2d\u3067\u3082\u304a\u3059\u3059\u3081\u306e\u5e97\u8217\u3092\u3044\u304f\u3064\u304b\u7d39\u4ecb\u3057\u307e\u3059\u3002\n\n1. \u3089\u30fc\u3081\u3093\u4e8c\u90ce \u65b0\u6a2a\u6d5c\u5e97\n - \u6fc3\u539a\u306a\u8c5a\u9aa8\u30b9\u30fc\u30d7\u3068\u5927\u76db\u308a\u306e\u5177\u304c\u7279\u5fb4\u306e\u4e8c\u90ce\u7cfb\u30e9\u30fc\u30e1\u30f3\u304c\u697d\u3057\u3081\u308b\u4eba\u6c17\u5e97\u3067\u3059\u3002\n\n2. \u3089\u30fc\u3081\u3093\u51e6 \u3068\u308f \u65b0\u6a2a\u6d5c\u5e97\n - \u9d8f\u30ac\u30e9\u3084\u9b5a\u4ecb\u306e\u30b9\u30fc\u30d7\u304c\u30d9\u30fc\u30b9\u306e\u3042\u3063\u3055\u308a\u3068\u3057\u305f\u5473\u308f\u3044\u306e\u30e9\u30fc\u30e1\u30f3\u304c\u8a55\u5224\u3067\u3059\u3002\n\n3. \u3089\u30fc\u3081\u3093 \u5eb5 \u65b0\u6a2a\u6d5c\u672c\u5e97\n - \u3053\u3063\u3066\u308a\u3068\u3057\u305f\u5473\u308f\u3044\u306e\u8c5a\u9aa8\u91a4\u6cb9\u30e9\u30fc\u30e1\u30f3\u304c\u4eba\u6c17\u3067\u3001\u5177\u6750\u3082\u8c4a\u5bcc\u3067\u6e80\u8db3\u611f\u304c\u3042\u308a\u307e\u3059\u3002\n\n\u3053\u308c\u3089\u306e\u304a\u5e97\u306f\u65b0\u6a2a\u6d5c\u99c5\u5468\u8fba\u306b\u4f4d\u7f6e\u3057\u3066\u304a\u308a\u3001\u7f8e\u5473\u3057\u3044\u30e9\u30fc\u30e1\u30f3\u3092\u697d\u3057\u3080\u3053\u3068\u304c\u3067\u304d\u307e\u3059\u3002\u305c\u3072\u8db3\u3092\u904b\u3093\u3067\u307f\u3066\u304f\u3060\u3055\u3044\u3002"}, "logprobs": null, "finish_reason": "stop"}], "usage": {"prompt_tokens": 51, "completion_tokens": 305, "total_tokens": 356}, "system_fingerprint": "fp_c2295e73ad"}}, "error": null}時間が経てば解決する可能性がありますが、現状の注意点としては留意しておく必要はあります。