はじめに
こんにちは。データサイエンスチームYAMALEXのSsk1029Takashiです。
最近はOpenAIに日本支社が出来て、日本語対応が加速するというニュースにわくわくしています。
今回はそんなOpenAIから発表されたBatch APIという機能が便利、かつお得な機能だったのでどのように使えるのか試してみます。
Introducing the Batch API: save costs and get higher rate limits on async tasks (such as summarization, translation, and image classification).
— OpenAI Developers (@OpenAIDevs) 2024年4月15日
Just upload a file of bulk requests, receive results within 24 hours, and get 50% off API prices: https://t.co/ls8DjR6qA9 pic.twitter.com/3W1GHijV3S
このBatch APIという機能はその名の通りAPIから利用できる機能で、複数のプロンプトをファイルにしてアップロードすることで一括処理できるという機能になります。
チャットのようにインタラクティブに結果を得られない代わりに、通常のAPIよりも50%も料金が安くなるというかなりうれしい機能になります。
Batch APIの特徴
Batch APIは以下の特徴を持っています。
注意するべきは処理の最大時間が24時間で、24時間以上かかるタスクについては途中まで実施してそれ以降の処理はキャンセルされます。
なので、もし24時間以上かかるBatchを実行したい場合は、複数回に分けて実行する必要があります。
Batch APIを使ってみる
ファイルを用意する
まずはBatch APIの入力にするプロンプトをまとめたファイルを作ります。
フォーマットが決められているので、以下の形のJSONを一行にしたJSONLファイルを用意します。
{
    "custom_id": "request-1", # ファイルの中で一意になるID
    "method": "POST", # 固定
    "url": "/v1/chat/completions", # 固定
    "body": {
        "model": "gpt-3.5-turbo", # 使うモデルを選択
        "messages": [ # ChatCompletionの入力形式
            {
                "role": "system",
                "content": "You are helpful assistant."
            },
            {
                "role": "user",
                "content": "What`s OpenAI?"
            }
        ]
    }
}
重要なのはbodyの中に、ChatCompletion APIの入力にするときのmessagesの形式でプロンプトを用意することです。
ここでシステムプロンプトとユーザーの入力を定義して入力できます。
今回はサンプルの実行なので、以下のようにGPT-4 Turboを使うプロンプトを10件用意します。
{"custom_id": "request-1", "method": "POST", "url": "/v1/chat/completions", "body": {"model": "gpt-4-turbo", "messages": [{"role": "system", "content": "You are helpful assistant."}, {"role": "user", "content": "What`s OpenAI?"}]}}
{"custom_id": "request-2", "method": "POST", "url": "/v1/chat/completions", "body": {"model": "gpt-4-turbo", "messages": [{"role": "system", "content": "You are a helpful assistant."}, {"role": "user", "content": "What`s GPT?"}]}}
{"custom_id": "request-3", "method": "POST", "url": "/v1/chat/completions", "body": {"model": "gpt-4-turbo", "messages": [{"role": "system", "content": "You are a helpful assistant."}, {"role": "user", "content": "Please explain about Transformer."}]}}
{"custom_id": "request-4", "method": "POST", "url": "/v1/chat/completions", "body": {"model": "gpt-4-turbo", "messages": [{"role": "system", "content": "You are a helpful assistant."}, {"role": "user", "content": "Please explain about LLM."}]}}
{"custom_id": "request-5", "method": "POST", "url": "/v1/chat/completions", "body": {"model": "gpt-4-turbo", "messages": [{"role": "system", "content": "You are a helpful assistant."}, {"role": "user", "content": "Please explain about Azure."}]}}
{"custom_id": "request-6", "method": "POST", "url": "/v1/chat/completions", "body": {"model": "gpt-4-turbo", "messages": [{"role": "system", "content": "You are a helpful assistant."}, {"role": "user", "content": "Please explain about Python."}]}}
{"custom_id": "request-7", "method": "POST", "url": "/v1/chat/completions", "body": {"model": "gpt-4-turbo", "messages": [{"role": "system", "content": "You are a helpful assistant."}, {"role": "user", "content": "How do I get started with machine learning?"}]}}
{"custom_id": "request-8", "method": "POST", "url": "/v1/chat/completions", "body": {"model": "gpt-4-turbo", "messages": [{"role": "system", "content": "You are a helpful assistant."}, {"role": "user", "content": "Please give me sample code for running the OpenAI API in Python."}]}}
{"custom_id": "request-9", "method": "POST", "url": "/v1/chat/completions", "body": {"model": "gpt-4-turbo", "messages": [{"role": "system", "content": "You are a helpful assistant."}, {"role": "user", "content": "What are your strengths?"}]}}
{"custom_id": "request-10", "method": "POST", "url": "/v1/chat/completions", "body": {"model": "gpt-4-turbo", "messages": [{"role": "system", "content": "You are a helpful assistant."}, {"role": "user", "content": "What are your weaknesses?"}]}}
これをinstructions.jsonlというファイルで保存します。
ファイルをアップロードする
ファイルを作成したら、OpenAI APIから一度ファイルをOpenAIのStorageにアップロードします。
今のところOpenAIのコンソールからのアップロードには上記フォーマットは対応していないので、curlなどを使って直接アップロードしましょう。
curl https://api.openai.com/v1/files \
  -H "Authorization: Bearer $OPANAI_KEY" \
  -F purpose="batch" \
  -F file="@instructions.jsonl"
ここで重要なのは、purposeをbatchに設定することです。
こうすることで、Batch用のフォーマットということを認識させてアップロードできます。
リクエストを実行して以下のようなレスポンスを得られればアップロード成功です。
{
  "object": "file",
  "id": "file-otymKIlaJNJxVx8LaM1bAEQ2",
  "purpose": "batch",
  "filename": "instructions.jsonl",
  "bytes": 2501,
  "created_at": 1713285032,
  "status": "processed",
  "status_details": null
}
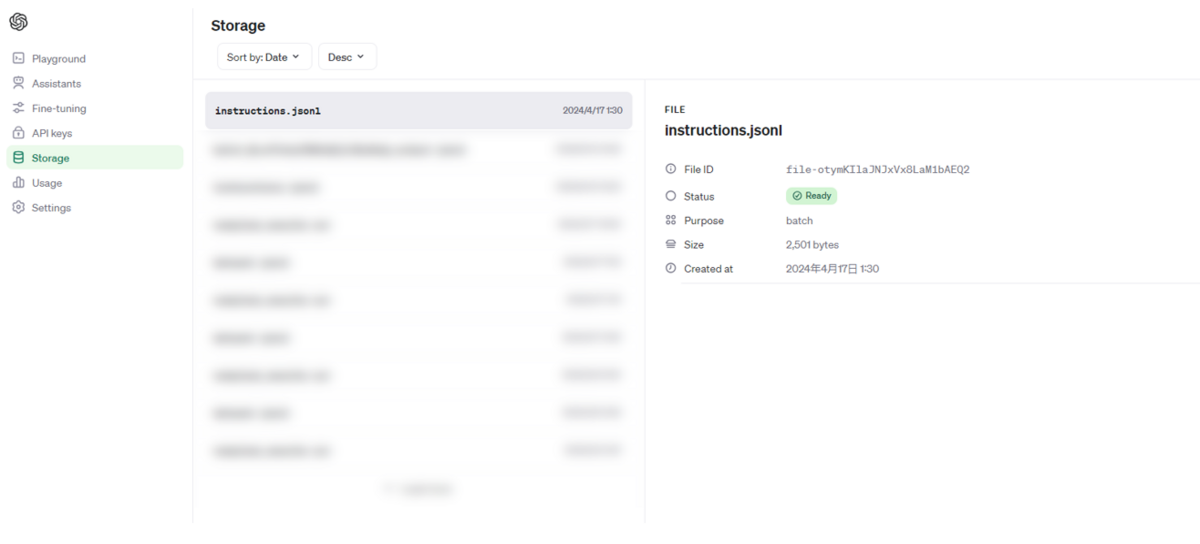
OpenAIのコンソールからもアップロードしたファイルが確認できるようになります。
この中で、File IDの値はBatch実行時に使用するので控えておきましょう。
Batchを実行する
ファイルをアップロードしたらBatchを実行します。
今のところ公式ドキュメントで紹介されているのはAPI経由の実行のみなので、こちらでもcurlなどを使用して実行しましょう。
curl https://api.openai.com/v1/batches \
  -H "Authorization: Bearer $OPANAI_KEY" \
  -H "Content-Type: application/json" \
  -d '{
    "input_file_id": "file-otymKIlaJNJxVx8LaM1bAEQ2",
    "endpoint": "/v1/chat/completions",
    "completion_window": "24h"
  }'
この時リクエストボディに設定するパラメータは以下になります。
| パラメータ名 | 設定する値 |
|---|---|
| input_file_id | ファイルアップロード時に取得したファイルのOpenAI上でのID |
| endpoint | 固定で/v1/chat/completionsを設定 |
| completion_window | Batchの最大実行時間指定。今は24hしか指定できない。 |
無事に実行できると以下のようなレスポンスを取得できます。
{
  "id": "batch_9E41M4O8YeY78GcarOnzwaB0",
  "object": "batch",
  "endpoint": "/v1/chat/completions",
  "errors": null,
  "input_file_id": "file-otymKIlaJNJxVx8LaM1bAEQ2",
  "completion_window": "24h",
  "status": "in_progress",
  "output_file_id": null,
  "error_file_id": null,
  "created_at": 1713285571,
  "in_progress_at": 1713285573,
  "expires_at": 1713371971,
  "finalizing_at": null,
  "completed_at": null,
  "failed_at": null,
  "expired_at": null,
  "cancelling_at": null,
  "cancelled_at": null,
  "request_counts": {
    "total": 10,
    "completed": 0,
    "failed": 0
  },
  "metadata": null
}
また、一度実行したBatchは今の状態をAPIから確認できます。
curl https://api.openai.com/v1/batches/batch_9E41M4O8YeY78GcarOnzwaB0 \
  -H "Authorization: Bearer $OPANAI_KEY" \
  -H "Content-Type: application/json"
パスパラメータにはBatch作成時のレスポンスの中からidの値、今回でいえば「batch_9E41M4O8YeY78GcarOnzwaB0」を入れます。
その値が実行したBatchを表すIDになっており、以下のような結果を得られます。
{
  "id": "batch_9E41M4O8YeY78GcarOnzwaB0",
  "object": "batch",
  "endpoint": "/v1/chat/completions",
  "errors": null,
  "input_file_id": "file-otymKIlaJNJxVx8LaM1bAEQ2",
  "completion_window": "24h",
  "status": "in_progress",
  "output_file_id": null,
  "error_file_id": null,
  "created_at": 1713285571,
  "in_progress_at": 1713285573,
  "expires_at": 1713371971,
  "finalizing_at": null,
  "completed_at": null,
  "failed_at": null,
  "expired_at": null,
  "cancelling_at": null,
  "cancelled_at": null,
  "request_counts": {
    "total": 10,
    "completed": 0,
    "failed": 0
  },
  "metadata": null
}
レスポンスが長いですが、この中でstatusを見ればいまBatchがどのような状態なのか確認できます。
例えば、上記のレスポンスの場合だとin_progressになっているので、現在実行中ということになります。
このstatusが「completed」という値になればBatchが完了したことになります。
実行結果を確認する
Batchが完了すると以下のようにOpenAIのコンソールにBatch実行結果のファイルが追加されていることが分かります。
今回はGPT-4 Turboを使うとはいえ10行だけだったので、10分弱で処理が完了しました。
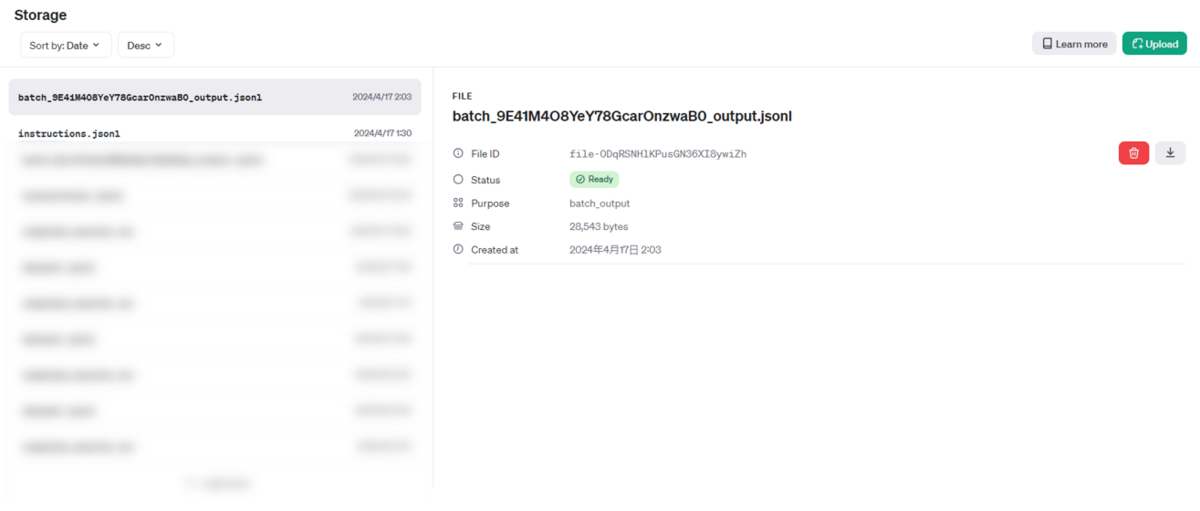
ダウンロードして中身を見ると以下のようにプロンプトを実行した結果の一覧を見ることができます。
ChatCompletionで得られるレスポンスは一通り記載されているので、usageなどの情報も見ることができます。
(長いので3行抜粋)
{"id": "batch_req_hZUECCsIMAT0NsrZ9taQC2S6", "custom_id": "request-7", "response": {"status_code": 200, "request_id": "req_735f5251489d353939dbda942ef6b37c", "body": {"id": "chatcmpl-9EgV0dWTMLrXNsPBSWA5Wj1xX2JRY", "object": "chat.completion", "created": 1713286986, "model": "gpt-4-turbo-2024-04-09", "choices": [{"index": 0, "message": {"role": "assistant", "content": "Getting started with machine learning (ML) can be an exciting journey into a field full of opportunities for innovation and impact across various industries like finance, healthcare, automotive, and more. Here\u2019s a structured way to begin learning about machine learning:\n\n### 1. Understand the Basics\nStart by gaining a foundational understanding of the concepts and terminology used in machine learning. Here are some key topics to cover:\n- **Basic Statistics & Mathematics:** Understand mean, median, mode, standard deviation, probability, and linear algebra.\n- **Types of Machine Learning:** Learn about supervised learning, unsupervised learning, reinforcement learning, and semi-supervised learning.\n- **Key Algorithms:** Get familiar with algorithms like linear regression, logistic regression, decision trees, SVM (Support Vector Machines), and neural networks.\n\n### 2. Online Courses\nThere are many online platforms offering free and paid courses that can provide structured learning and hands-on practice:\n- **Coursera:** Andrew Ng\u2019s Machine Learning course is highly recommended.\n- **edX:** Offers courses from MIT and Harvard.\n- **Udacity:** Known for its Nanodegree programs in Deep Learning and Machine Learning.\n- **Khan Academy:** Good for strengthening your math skills.\n\n### 3. Get Hands-On Experience\nAlongside theoretical learning, it\u2019s essential to practice:\n- **Kaggle:** Participate in competitions or explore datasets.\n- **GitHub:** Look at ML projects and try to replicate them. Start your own projects and share them.\n- **Python Libraries:** Get familiar with Scikit-learn, TensorFlow, PyTorch, and Pandas. Python is widely used in the machine learning community due to its simplicity and powerful libraries.\n\n### 4. Books\nSome good books to start with are:\n- **\u201cPattern Recognition and Machine Learning\u201d** by Christopher M. Bishop\n- **\u201cMachine Learning Yearning\u201d** by Andrew Ng (more strategy than technical details)\n- **\u201cHands-On Machine Learning with Scikit-Learn, Keras, and TensorFlow\u201d** by Aur\u00e9lien G\u00e9ron\n\n### 5. Work on Projects\nApplying what you\u2019ve learned to actual projects is crucial:\n- Begin with simple projects like predicting stock prices, or recognizing hand-written digits.\n- Move on to more complex problems as you grow comfortable.\n\n### 6. Follow Thought Leaders and Keep Updated\n- Follow key influencers on platforms like LinkedIn, Twitter, Medium.\n- Regularly read articles, research papers, and blogs to keep up with new trends and breakthroughs in ML technology.\n\n### 7. Engage with the Community\n- Participate in Meetups, Conferences, and Workshops.\n- Engage in forums like Stack Overflow, Reddit's r/MachineLearning, or Cross Validated on Stack Exchange.\n\n### 8. Understand Ethical Implications\nAs you delve deeper, understand the ethical considerations in deploying ML, including bias, fairness, and the environmental impact of training large models.\n\n### 9. Consider Specialization\nAs you advance, think about specializing in areas that are in high demand, such as deep learning, natural language processing, or computer vision, depending on what interests you the most.\n\nStarting with these steps will help you build a strong foundation and guide you through becoming proficient in machine learning. Always remember, consistent practice and continual learning are key components of success in this ever-evolving field."}, "logprobs": null, "finish_reason": "stop"}], "usage": {"prompt_tokens": 26, "completion_tokens": 685, "total_tokens": 711}, "system_fingerprint": "fp_76f018034d"}}, "error": null}
{"id": "batch_req_DiZi0B5pBGwoESHn2VgSjrSz", "custom_id": "request-8", "response": {"status_code": 200, "request_id": "req_c3651f89bbb024df85d35a8d2f0c27b7", "body": {"id": "chatcmpl-9EgV0COWoixZMe7OszEThJlqb6xQU", "object": "chat.completion", "created": 1713286986, "model": "gpt-4-turbo-2024-04-09", "choices": [{"index": 0, "message": {"role": "assistant", "content": "Sure! To run the OpenAI API in Python, you'll primarily rely on the `openai` library. Let\u2019s use an example where we send a prompt to the GPT model and receive a text completion. First, you need to install the OpenAI Python library if you haven't yet. You can install it using pip:\n\n```bash\npip install openai\n```\n\n### Example Code for Using OpenAI GPT\n\nHere's a simple example of how you can use the API to interact with the GPT model. In this code snippet, I assume you have your API key ready. For security reasons, you should not hard-code your API Key in your source code. Instead, use environment variables or other secure methods to store your API Key.\n\n```python\nimport openai\n\ndef get_gpt_response(prompt_text):\n    openai.api_key = 'your-api-key-here'\n\n    try:\n        response = openai.Completion.create(\n            engine=\"text-davinci-003\",  # You can use different models like \"davinci\", \"curie\", etc.\n            prompt=prompt_text,\n            max_tokens=150  # You can adjust this value based on your needs\n        )\n        return response.choices[0].text.strip()\n    except Exception as e:\n        print(f\"An error occurred: {e}\")\n        return None\n\n# Example usage\nprompt_text = \"Explain the benefits of AI in education.\"\nresponse_text = get_gpt_response(prompt_text)\nprint(response_text)\n```\n\n### Notes:\n1. **API Key Security**: Do not hard-code your API keys in your code. Instead, use environment variables. You can set this up in your local environment or whatever deployment environment you are using.\n\n2. **API Usage Limits**: Be aware of the usage limits and potential costs associated with API requests. Make sure to review OpenAI's usage policies and pricing.\n\n3. **Error Handling**: The code includes basic error handling which is crucial for dealing with network issues or API limits.\n\n4. **Model Selection**: OpenAI provides various models with different capabilities and cost structures. Choose the appropriate model based on your needs.\n\n5. **Response Processing**: The response from the API contains multiple components. We are mostly interested in the textual completion, which is accessed via `response.choices[0].text`.\n\n6. **Environment**: This code is to be run in a standard Python environment where you have the necessary permissions and network access to reach OpenAI's API servers.\n\nThis should help you get started with using OpenAI's API in your Python applications!"}, "logprobs": null, "finish_reason": "stop"}], "usage": {"prompt_tokens": 31, "completion_tokens": 526, "total_tokens": 557}, "system_fingerprint": "fp_76f018034d"}}, "error": null}
{"id": "batch_req_8nDALG7zrVMxiFk5o6nvrYbT", "custom_id": "request-5", "response": {"status_code": 200, "request_id": "req_0ef9ec2e8d633ebdf9f5000d9386136d", "body": {"id": "chatcmpl-9EgV0tJJ5JRL8SJxp7IvMlpfcPuYC", "object": "chat.completion", "created": 1713286986, "model": "gpt-4-turbo-2024-04-09", "choices": [{"index": 0, "message": {"role": "assistant", "content": "Microsoft Azure, commonly referred to simply as Azure, is a cloud computing service created by Microsoft for building, testing, deploying, and managing applications and services through Microsoft-managed data centers. It provides software as a service (SaaS), platform as a service (PaaS), and infrastructure as a service (IaaS) and supports many different programming languages, tools, and frameworks, including both Microsoft-specific and third-party software and systems.\n\n### Major Features of Azure:\n1. **Computing**: Azure provides virtual machines, containers, and batch processing, as well as remote application access.\n2. **Storage Solutions**: This includes Azure Blob storage, Queue Storage, File Storage, and Table Storage.\n3. **Networking**: This feature provides a variety of networking tools such as Virtual Networks, VPN Gateways, Application Gateways, and Content Delivery Networks.\n4. **Databases**: Azure offers managed SQL and NoSQL database services.\n5. **Mobile and Web Applications**: Azure facilitates the development, testing, and hosting of web and mobile applications.\n6. **AI and Machine Learning**: Tools and services designed to automate operations using AI and machine learning.\n7. **Internet of Things (IoT)**: Azure IoT Hub and other tools help collect, monitor, and analyze IoT data.\n8. **Developer Tools**: Provides support for DevOps, continuous integration, and testing environments.\n9. **Security**: Azure\u2019s security services protect workloads, applications, and data across cloud and hybrid environments.\n\n### Advantages of Azure:\n- **Scalability and Flexibility**: Azure can scale up or down based on demand, making it suitable for businesses of all sizes.\n- **Compliance and Security**: Azure has many compliance certifications and is built with security in mind, offering users peace of mind regarding their data.\n- **Hybrid Capabilities**: Azure provides a wide range of hybrid connections, including VPNs, caches, content delivery networks, and express routing connections to improve usability and performance.\n- **Integrated Environment**: Azure is deeply integrated with other Microsoft products, making it an ideal choice for organizations that rely on Microsoft tools and software.\n\n### Use Cases:\n- **Web Hosting**: Businesses can use Azure to host their websites and web applications.\n- **Data Storage and Backup**: It provides secure and scalable cloud storage solutions.\n- **Mobile App Development**: Azure supports backend services for mobile applications.\n- **Big Data and Analytics**: Offering powerful analytics services to handle large sets of data.\n- **Disaster Recovery**: With high availability and data recovery capabilities, Azure is an excellent option for disaster recovery.\n\nAzure continually evolves by expanding its services and capabilities to suit a broad spectrum of industries, including finance, health, government, manufacturing, and more, providing comprehensive cloud solutions for businesses globally."}, "logprobs": null, "finish_reason": "stop"}], "usage": {"prompt_tokens": 22, "completion_tokens": 556, "total_tokens": 578}, "system_fingerprint": "fp_76f018034d"}}, "error": null}
以上でBatch APIを使う一通りの流れは完了になります。
実行自体はファイルアップロードしてAPIを実行するだけなので簡単でしたね。
ただし、簡単な注意事項としてリリースされたばかりだからか、日本語を結果で出力するときには下記のようにUnicodeがそのまま出力されてしまいます。
{"id": "batch_req_LFEtMhsQqZa4GU5qpXLTVmES", "custom_id": "request-1", "response": {"status_code": 200, "request_id": "req_5cdf7d1538045d5946d0dcaa0edf4c79", "body": {"id": "chatcmpl-9EWZ0wTGl6VRZm0AHZrenKMi6gdiE", "object": "chat.completion", "created": 1713248794, "model": "gpt-3.5-turbo-0125", "choices": [{"index": 0, "message": {"role": "assistant", "content": "\u65b0\u6a2a\u6d5c\u306b\u306f\u591a\u304f\u306e\u304a\u3044\u3057\u3044\u30e9\u30fc\u30e1\u30f3\u5c4b\u304c\u3042\u308a\u307e\u3059\u304c\u3001\u305d\u306e\u4e2d\u3067\u3082\u304a\u3059\u3059\u3081\u306e\u5e97\u8217\u3092\u3044\u304f\u3064\u304b\u7d39\u4ecb\u3057\u307e\u3059\u3002\n\n1. \u3089\u30fc\u3081\u3093\u4e8c\u90ce \u65b0\u6a2a\u6d5c\u5e97\n - \u6fc3\u539a\u306a\u8c5a\u9aa8\u30b9\u30fc\u30d7\u3068\u5927\u76db\u308a\u306e\u5177\u304c\u7279\u5fb4\u306e\u4e8c\u90ce\u7cfb\u30e9\u30fc\u30e1\u30f3\u304c\u697d\u3057\u3081\u308b\u4eba\u6c17\u5e97\u3067\u3059\u3002\n\n2. \u3089\u30fc\u3081\u3093\u51e6 \u3068\u308f \u65b0\u6a2a\u6d5c\u5e97\n - \u9d8f\u30ac\u30e9\u3084\u9b5a\u4ecb\u306e\u30b9\u30fc\u30d7\u304c\u30d9\u30fc\u30b9\u306e\u3042\u3063\u3055\u308a\u3068\u3057\u305f\u5473\u308f\u3044\u306e\u30e9\u30fc\u30e1\u30f3\u304c\u8a55\u5224\u3067\u3059\u3002\n\n3. \u3089\u30fc\u3081\u3093 \u5eb5 \u65b0\u6a2a\u6d5c\u672c\u5e97\n - \u3053\u3063\u3066\u308a\u3068\u3057\u305f\u5473\u308f\u3044\u306e\u8c5a\u9aa8\u91a4\u6cb9\u30e9\u30fc\u30e1\u30f3\u304c\u4eba\u6c17\u3067\u3001\u5177\u6750\u3082\u8c4a\u5bcc\u3067\u6e80\u8db3\u611f\u304c\u3042\u308a\u307e\u3059\u3002\n\n\u3053\u308c\u3089\u306e\u304a\u5e97\u306f\u65b0\u6a2a\u6d5c\u99c5\u5468\u8fba\u306b\u4f4d\u7f6e\u3057\u3066\u304a\u308a\u3001\u7f8e\u5473\u3057\u3044\u30e9\u30fc\u30e1\u30f3\u3092\u697d\u3057\u3080\u3053\u3068\u304c\u3067\u304d\u307e\u3059\u3002\u305c\u3072\u8db3\u3092\u904b\u3093\u3067\u307f\u3066\u304f\u3060\u3055\u3044\u3002"}, "logprobs": null, "finish_reason": "stop"}], "usage": {"prompt_tokens": 51, "completion_tokens": 305, "total_tokens": 356}, "system_fingerprint": "fp_c2295e73ad"}}, "error": null}時間が経てば解決する可能性がありますが、現状の注意点としては留意しておく必要はあります。
まとめ
この記事ではBatch APIを使って複数のプロンプトを一括処理する流れを試してみました。
APIを使うこと自体はとても簡単で入力のファイルさえ用意すれば簡単に実行できました。
リアルタイム性が必要なく、大量のテキストをまとめて要約するようなケースでは非常にありがたい機能になりそうです。
それではまた。
Acroquest Technologyでは、キャリア採用を行っています。
- ディープラーニング等を使った自然言語/画像/音声/動画解析の研究開発
- Elasticsearch等を使ったデータ収集/分析/可視化
- マイクロサービス、DevOps、最新のOSSを利用する開発プロジェクト
- 書籍・雑誌等の執筆や、社内外での技術の発信・共有によるエンジニアとしての成長
少しでも上記に興味を持たれた方は、是非以下のページをご覧ください。