こんにちは、阪本です。

昨年末に、Springがメジャーバージョンアップして4.0になりましたね。
代表的な変更点を上げてみても、
- コールバック関数のJava8ラムダ式対応
- Java EE 6 & 7 対応
- GroovyによるSpring定義の記述対応
- WebSocket、SockJS、STOMP対応
- 非同期REST対応等のRESTインタフェース機能拡張
のように、大きな機能追加・変更が行われていますが、その中でも、最近流行りのWebSocketに対応したということで、少し触ってみました。
まずは実装
超シンプルなチャットプログラムを作ってみます。
(エラー処理等は割愛。)
まずはサーバサイドから。
Mavenのpom.xmlのdependenciesに、Springの標準ライブラリに加えて、WebSocket用のライブラリ(spring-websocket)を定義します。
<dependency>
  <groupId>org.springframework</groupId>
  <artifactId>spring-context</artifactId>
  <version>${spring.version}</version>
  <exclusions>
    <exclusion>
      <groupId>commons-logging</groupId>
      <artifactId>commons-logging</artifactId>
    </exclusion>
  </exclusions>
</dependency>
<dependency>
  <groupId>org.springframework</groupId>
  <artifactId>spring-webmvc</artifactId>
  <version>${spring.version}</version>
</dependency>
<dependency>
  <groupId>org.springframework</groupId>
  <artifactId>spring-websocket</artifactId>
  <version>${spring.version}</version>
</dependency>
もちろん、 ${spring.version} は 4.0.0 です。
次にweb.xml 。
通常のHTTPリクエストを処理するのと同じく、WebSocketのハンドシェイクを受けるのもDispatcherServletです。
<?xml version="1.0" encoding="UTF-8"?>
<web-app xmlns:xsi="http://www.w3.org/2001/XMLSchema-instance"
    xmlns="http://java.sun.com/xml/ns/javaee"
    xmlns:web="http://java.sun.com/xml/ns/javaee/web-app_3_0.xsd"
    xsi:schemaLocation="http://java.sun.com/xml/ns/javaee http://java.sun.com/xml/ns/javaee/web-app_3_0.xsd"
    id="WebApp_ID" version="3.0">
  <display-name>WebSocketServer</display-name>

  <!-- JavaConfigを用いるための設定 -->
  <context-param>
    <param-name>contextClass</param-name>
    <param-value>org.springframework.web.context.support.AnnotationConfigWebApplicationContext</param-value>
  </context-param>
  <context-param>
    <param-name>contextConfigLocation</param-name>
    <param-value>websocket.config.ApplicationConfig</param-value>
  </context-param>

  <listener>
    <listener-class>org.springframework.web.context.request.RequestContextListener</listener-class>
  </listener>
  <listener>
    <listener-class>org.springframework.web.context.ContextLoaderListener</listener-class>
  </listener>

  <servlet>
    <servlet-name>rootServlet</servlet-name>
    <servlet-class>org.springframework.web.servlet.DispatcherServlet</servlet-class>
    <init-param>
      <param-name>contextClass</param-name>
      <param-value>org.springframework.web.context.support.AnnotationConfigWebApplicationContext</param-value>
    </init-param>
    <init-param>
      <param-name>contextConfigLocation</param-name>
      <param-value></param-value>
    </init-param>
    <load-on-startup>1</load-on-startup>
  </servlet>

  <servlet-mapping>
    <servlet-name>rootServlet</servlet-name>
    <url-pattern>/echo</url-pattern>
  </servlet-mapping>

</web-app>
SpringのBean定義。JavaConfigを用いると、以下のように書きます。
@EnableWebSocket アノテーションを書くことで、WebSocketが有効になります。
合わせて、WebSocketConfigurerインタフェースを実装します。
registerWebSocketHandlersメソッドの中で、実際のWebSocket通信を処理するハンドラ(ここではEchoHandler)を登録します。
なお、コネクションごとにハンドラオブジェクトを分ける場合は、PerConnectionWebSocketHandlerを用います。
package websocket.config;

import org.springframework.context.annotation.Configuration;
import org.springframework.web.socket.config.annotation.EnableWebSocket;
import org.springframework.web.socket.config.annotation.WebSocketConfigurer;
import org.springframework.web.socket.config.annotation.WebSocketHandlerRegistry;

import websocket.handler.EchoHandler;

@Configuration
@EnableWebSocket
public class ApplicationConfig implements WebSocketConfigurer {

    @Override
    public void registerWebSocketHandlers(WebSocketHandlerRegistry registry)
    {
        registry.addHandler(new EchoHandler(), "/echo");
        // セッションごとにオブジェクトを分ける場合は以下のように書く
        // registry.addHandler(new PerConnectionWebSocketHandler(XxxHandler.class), "/echo");
    }

}
ハンドラ(EchoHandler)の中身。受信した文字列(TextMessage)を、各クライアントに転送します。
今回は文字列の送受信を行うので、TextWebSocketHandlerクラスを継承しています。
バイナリデータを送受信する場合はBinaryWebSocketHandlerクラスを継承します。
package websocket.handler;

import static java.util.Map.Entry;

import java.util.Map;
import java.util.concurrent.ConcurrentHashMap;

import org.springframework.web.socket.CloseStatus;
import org.springframework.web.socket.TextMessage;
import org.springframework.web.socket.WebSocketSession;
import org.springframework.web.socket.handler.TextWebSocketHandler;

public class EchoHandler extends TextWebSocketHandler {
    /** セッション一覧 */
    private Map<String, WebSocketSession> sessionMap_ = new ConcurrentHashMap<>();

    @Override
    public void afterConnectionEstablished(WebSocketSession session) throws Exception {
        this.sessionMap_.put(session.getId(), session);
    }

    @Override
    public void afterConnectionClosed(WebSocketSession session,
            CloseStatus status) throws Exception {
        this.sessionMap_.remove(session.getId());
    }

    @Override
    public void handleTextMessage(WebSocketSession session, TextMessage message) throws Exception {
        // 接続されているセッション(自分も含め)に転送する
        for (Entry<String, WebSocketSession> entry : this.sessionMap_.entrySet()) {
            entry.getValue().sendMessage(message);
        }
    }

}
最後に、HTMLファイルの内容です。
テキストフィールドに文字列を入力し、「送信」ボタンを押下すると、サーバに文字列を送信します。
サーバからメッセージを受信したら、divの中身に追記します。
<!DOCTYPE html>
<html>

<head>
  <script type="text/javascript" src="./views/lib/jquery.js"></script>
  <script type="text/javascript">
    $(function(){
      var ws = new WebSocket("ws://localhost:8080/WebSocketServer/echo");

      ws.onopen = function(){
      };

      ws.onclose = function(){
      };

      ws.onmessage = function(message){
        $("#log").append(message.data).append("<br/>");
        $("#message").val("")
      };

      ws.onerror = function(event){
        alert("エラー");
      };

      $("#form").submit(function(){
        ws.send($("#message").val());
        return false;
      });
    });
  </script>
</head>

<body>
  <div id="log"></div>
  <form id="form" action="#">
    <input type="text" id="message" /> <input type="submit" id="send" value="送信" />
  </form>
</body>

</html>
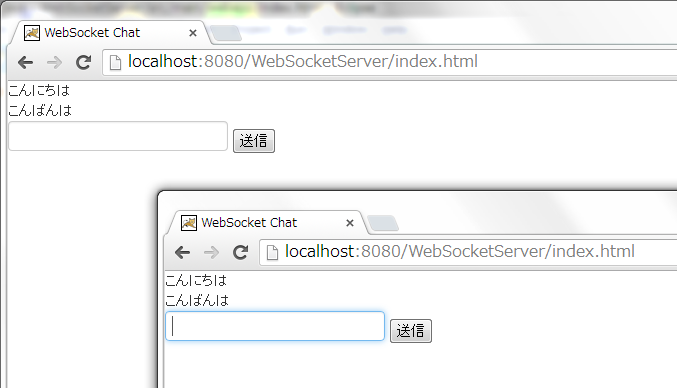
ちなみに、こんな画面になります。

なお、上の例では、Springの定義をJavaConfigで記述しましたが、XMLで記述したい場合は以下のように書きます。
<?xml version="1.0" encoding="UTF-8"?>
<beans xmlns="http://www.springframework.org/schema/beans"
  xmlns:xsi="http://www.w3.org/2001/XMLSchema-instance"
  xmlns:websocket="http://www.springframework.org/schema/websocket"
  xsi:schemaLocation="
    http://www.springframework.org/schema/beans
    http://www.springframework.org/schema/beans/spring-beans.xsd
    http://www.springframework.org/schema/websocket
    http://www.springframework.org/schema/websocket/spring-websocket.xsd">

    <websocket:handlers>
        <websocket:mapping path="/echo" handler="echoHandler" />
    </websocket:handlers>

    <bean id="echoHandler" class="websocket.handler.EchoHandler" />

</beans>
IE8/9に対応する(SockJSを使う)
WebSocket自体、IEは10以降でないと対応していません。
業務系ではまだまだIE8/9を使用しているところも多いはず。
そんなIE8/9ユーザには、WebSocketの動作をエミュレートする「SockJS」を使うと、
似たような動きを実現することができます!
WebSocketを用いる場合はWebSocketオブジェクトを生成していましたが、
SockJSを用いる場合はSockJSオブジェクトを生成します(引数のURLのプロトコル部分がhttpとなっていることに注意)。
これだけ。
<head>
  <script src="http://cdn.sockjs.org/sockjs-0.3.min.js"></script>
  <script type="text/javascript">
    $(function(){
      var sock = new SockJS("http://localhost:8080/WebSocketServer/echo");

      sock.onopen = function(){
      };

      sock.onclose = function(){
      };

      sock.onmessage = function(message){
        $("#log").append(message.data).append("<br/>");
        $("#message").val("")
      };

      sock.onerror = function(event){
        alert("エラー");
      };

      $("#form").submit(function(){
        sock.send($("#message").val());
        return false;
      });
    });
  </script>
</head>
SockJSはWebSocketを擬似的に再現しているに過ぎないため、通信の仕組みが異なります。
そのため、サーバサイドもWebSocketと同じ実装では動きません。
・・・
と言いましたが、Spring4.0では、なんと、たった13バイト付け足すことでSockJSに対応できます。
addHandlerメソッドの呼び出しの後ろに「.withSockJS()」を付けるだけ!超簡単!便利!!
package websocket.config;

import org.springframework.context.annotation.Configuration;
import org.springframework.web.socket.config.annotation.EnableWebSocket;
import org.springframework.web.socket.config.annotation.WebSocketConfigurer;
import org.springframework.web.socket.config.annotation.WebSocketHandlerRegistry;

import websocket.handler.EchoHandler;

@Configuration
@EnableWebSocket
public class ApplicationConfig implements WebSocketConfigurer {

    @Override
    public void registerWebSocketHandlers(WebSocketHandlerRegistry registry)
    {
        registry.addHandler(new EchoHandler(), "/echo").withSockJS();
        // セッションごとにオブジェクトを分ける場合は以下のように書く
        // registry.addHandler(new PerConnectionWebSocketHandler(XxxHandler.class), "/echo").withSockJS();
    }

}
Springの定義をXMLで記述する場合も、「<websocket:sockjs />」を記述するだけ。
<?xml version="1.0" encoding="UTF-8"?>
<beans xmlns="http://www.springframework.org/schema/beans"
  xmlns:xsi="http://www.w3.org/2001/XMLSchema-instance"
  xmlns:websocket="http://www.springframework.org/schema/websocket"
  xsi:schemaLocation="
    http://www.springframework.org/schema/beans
    http://www.springframework.org/schema/beans/spring-beans.xsd
    http://www.springframework.org/schema/websocket
    http://www.springframework.org/schema/websocket/spring-websocket.xsd">

    <websocket:handlers>
        <websocket:mapping path="/echo" handler="echoHandler" />
        <websocket:sockjs />
    </websocket:handlers>

    <bean id="echoHandler" class="websocket.handler.EchoHandler" />

</beans>
ハンドラ等はWebSocketと同じものをそのまま使えます。
補足:APサーバに依存しない理由
今までは、WebSocketプログラムを作る場合、APサーバが提供するServletクラスを継承して作っていたため、プログラムがAPサーバに依存した作りになっていました。
(例えばJettyの場合は、org.eclipse.jetty.websocket.servlet.WebSocketServletクラスを継承してServletを作ります。)
それに比べて、上のチャットプログラムは、APサーバに依存しない実装となっています。
APサーバ依存脱却!
・・・といいつつも、WebSocketの実現の仕組みは、APサーバによって異なるはず。
では、どこでAPサーバ依存の処理を行っているのでしょうか?
気になってSpringのソースコードを見てみると・・・やはりありました!
Spring WebSocketモジュールのDefaultHandshakeHandlerクラスで、APサーバ依存の処理を切り分けています。
private static final boolean jettyWsPresent = ClassUtils.isPresent(
        "org.eclipse.jetty.websocket.server.WebSocketServerFactory", DefaultHandshakeHandler.class.getClassLoader());

private static final boolean tomcatWsPresent = ClassUtils.isPresent(
        "org.apache.tomcat.websocket.server.WsHttpUpgradeHandler", DefaultHandshakeHandler.class.getClassLoader());

private static final boolean glassFishWsPresent = ClassUtils.isPresent(
        "org.glassfish.tyrus.servlet.TyrusHttpUpgradeHandler", DefaultHandshakeHandler.class.getClassLoader());

(中略)

private static RequestUpgradeStrategy initRequestUpgradeStrategy() {
    String className;
    if (jettyWsPresent) {
        className = "org.springframework.web.socket.server.jetty.JettyRequestUpgradeStrategy";
    }
    else if (tomcatWsPresent) {
        className = "org.springframework.web.socket.server.standard.TomcatRequestUpgradeStrategy";
    }
    else if (glassFishWsPresent) {
        className = "org.springframework.web.socket.server.standard.GlassFishRequestUpgradeStrategy";
    }
    else {
        throw new IllegalStateException("No suitable default RequestUpgradeStrategy found");
    }
    try {
        Class<?> clazz = ClassUtils.forName(className, DefaultHandshakeHandler.class.getClassLoader());
        return (RequestUpgradeStrategy) clazz.newInstance();
    }
    catch (Throwable ex) {
        throw new IllegalStateException("Failed to instantiate RequestUpgradeStrategy: " + className, ex);
    }
}
Jetty、Tomcat、GlassFish、それぞれのWebSocket用クラスが存在するかチェックして、ハンドシェイク処理クラスを切り替えています。
これにより、私たちはAPサーバの種類を意識せずに実装できます。
・・・もうお分かりのように、Spring4.0のWebSocket対応APサーバは、Jetty、Tomcat、GlassFishです^^
おわりに
今後、WebSocketを使用したシステムは増えてきます。
APサーバ依存性の排除や実装量の削減に、Springを活用するのは有効な手段と思います。
ぜひ、試してみてください。
では。
Acroquest Technologyでは、キャリア採用を行っています。
- 日頃勉強している成果を、Hadoop、Storm、NoSQL、HTML5/CSS3/JavaScriptといった最新の技術を使ったプロジェクトで発揮したい。
- 社会貢献性の高いプロジェクトに提案からリリースまで携わりたい。
- 書籍・雑誌等の執筆や対外的な勉強会の開催を通した技術の発信や、社内勉強会での技術情報共有により、技術的に成長したい。
- OSSの開発に携わりたい。
少しでも上記に興味を持たれた方は、是非以下のページをご覧ください。
キャリア採用ページ